- Published on
- | 7 mins read
Chap 4 - Auto Deploy a Flutter Game to the Web using Codemagic
- Authors
- Name
- Miller Go Dev
- @millergodev
Overview
Table of Contents
TL;DR
The game is now published at https://monopoly_deal.codemagic.app
Problem
Being agile is a goal when we started this project, and we cannot be agile if we don't deliver a working software constantly. Today, we will setup a continuos deployment pipeline with Codemagic to deliver our game whenever there is a new commit on the master branch.
Why Codemagic?
There are many services out there to configure a continuos deployment pipeline for a Flutter app: Github Actions, CircleCI, Jenkins, Codemagic, etc. Each service has its pros and cons. However, I prefer Codemagic because it the only service that focused on Flutter deployment pipeline since the day one. The process to setup a new build on Codemagic is pretty easier than others (less than 5 mins to bring our app to the world). You will learn it right away.
Setup a Flutter deployment pipeline on Codemagic
First, we need go to codemagic.io and register a FREE account to get started.
After that, we will be led to the Codemagic app at codemagic.io/apps. We will create a new app.
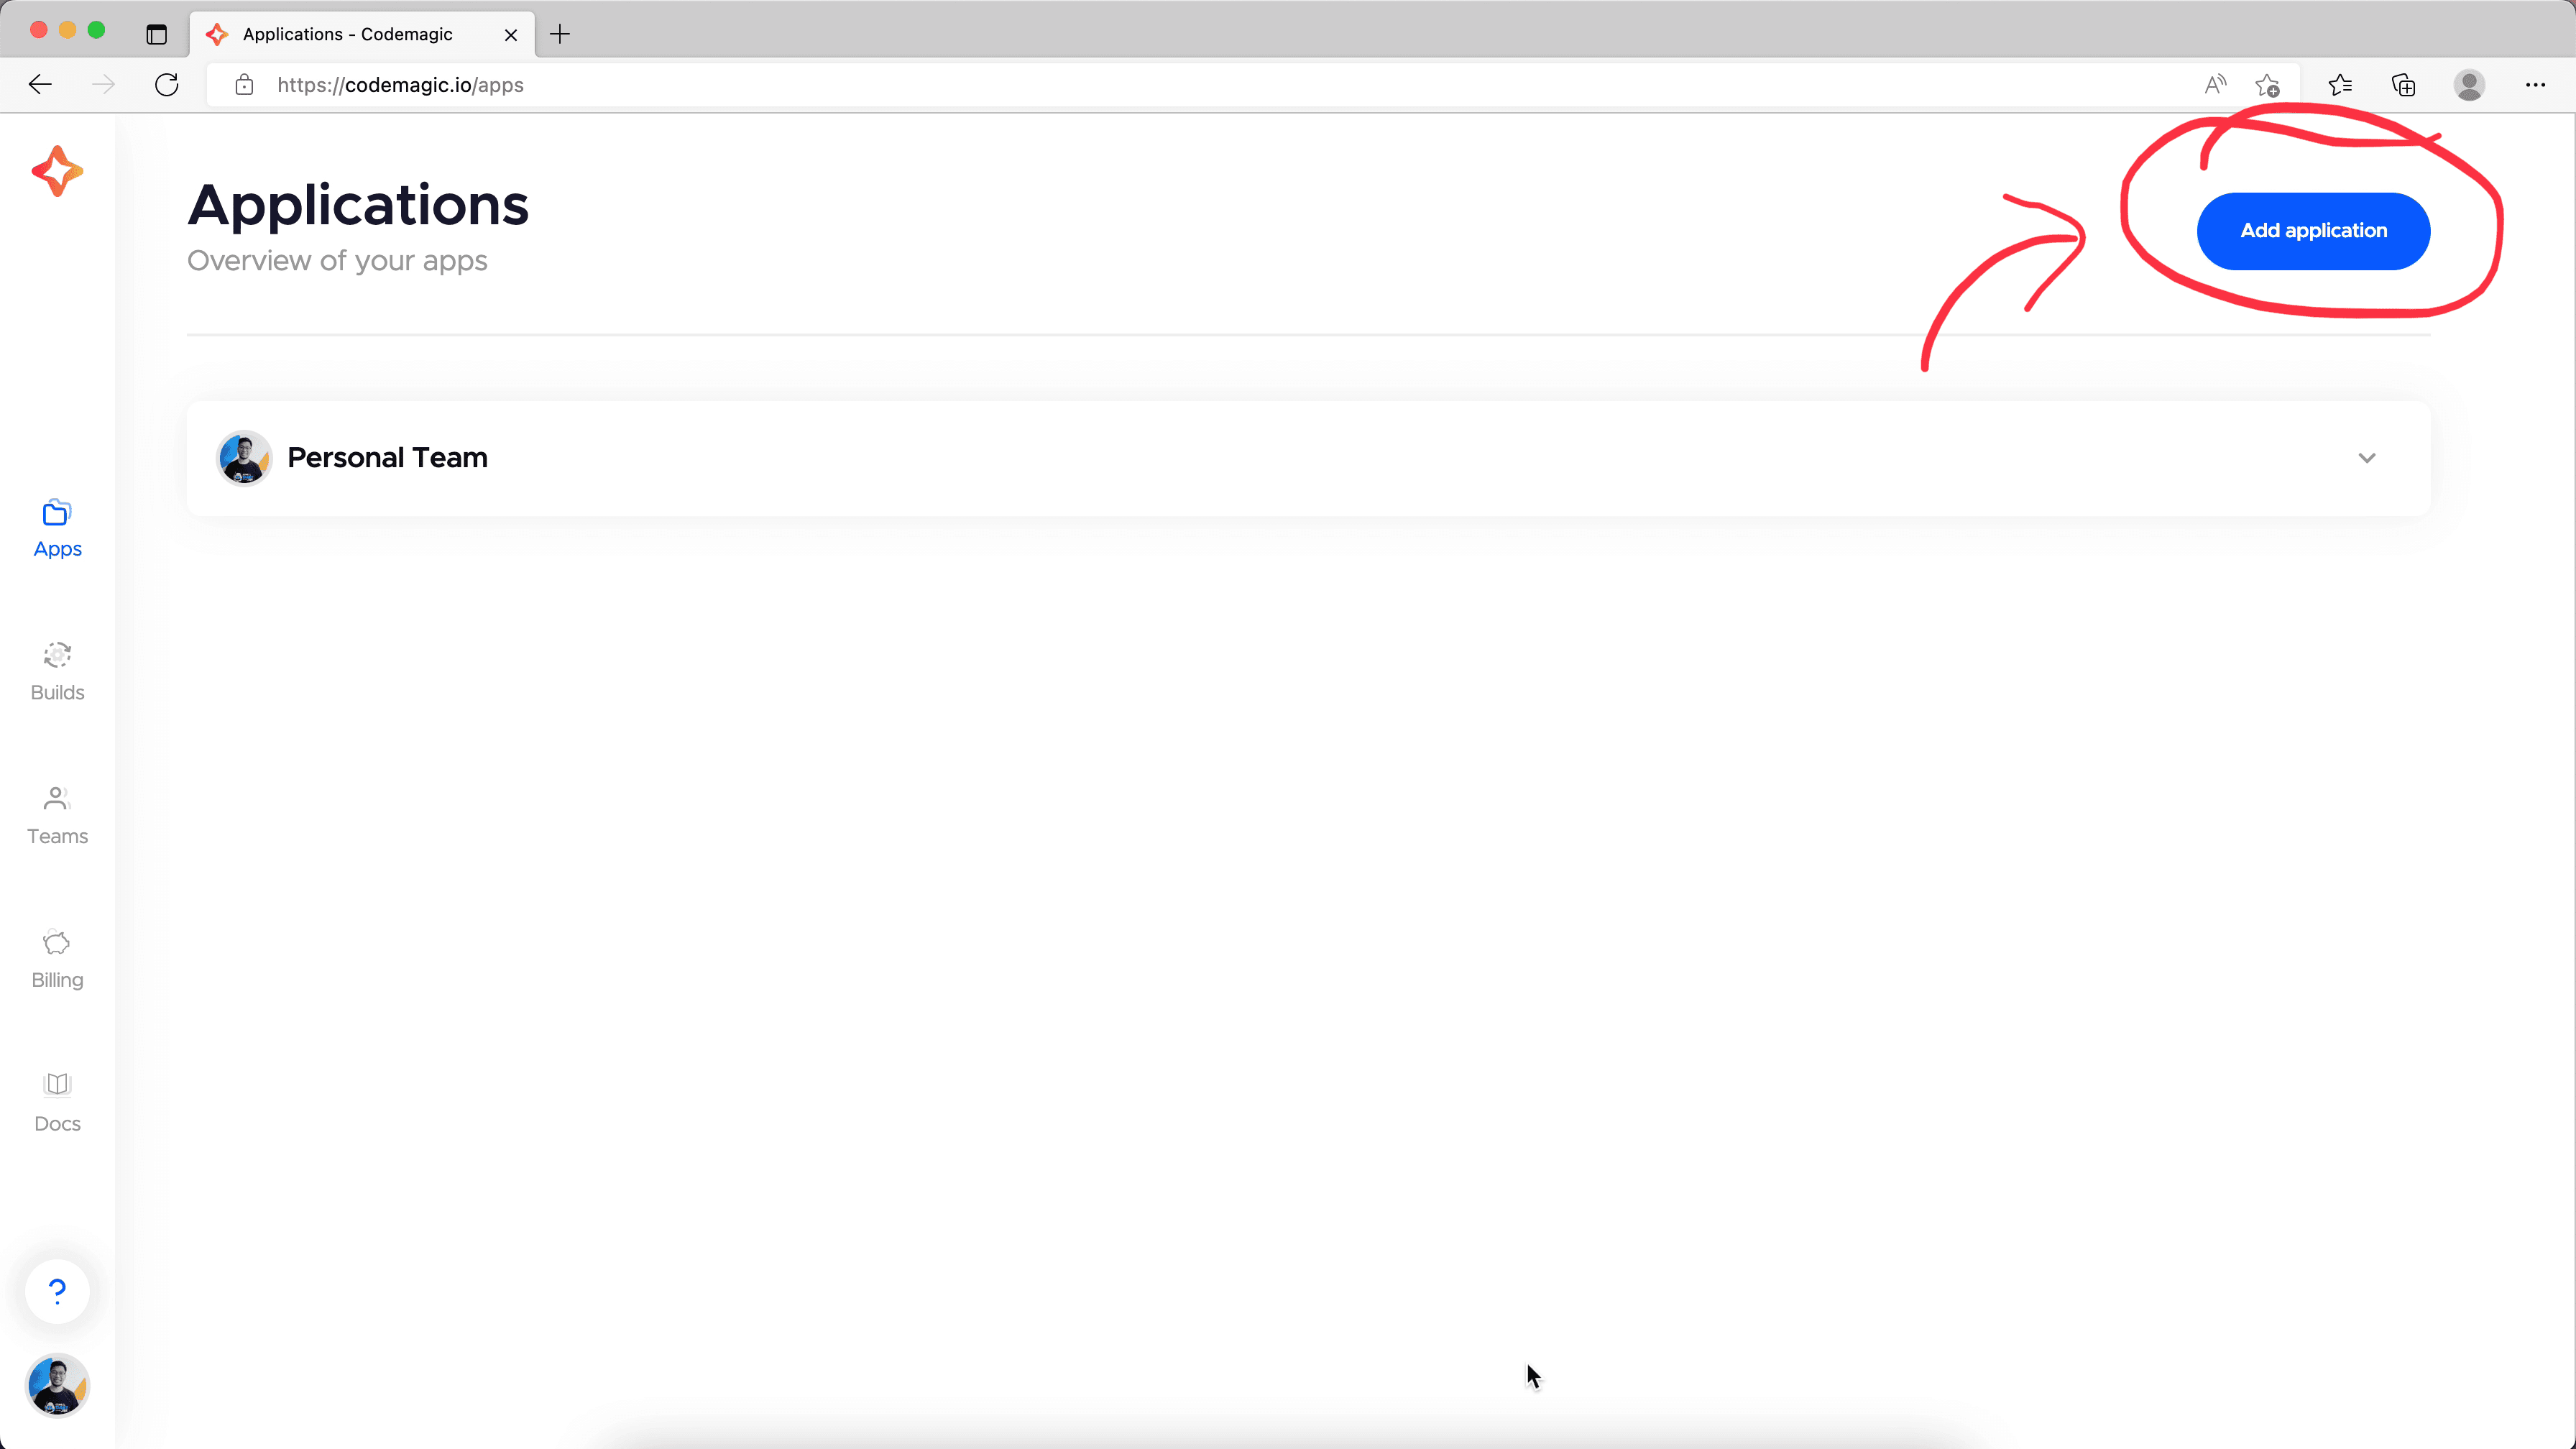
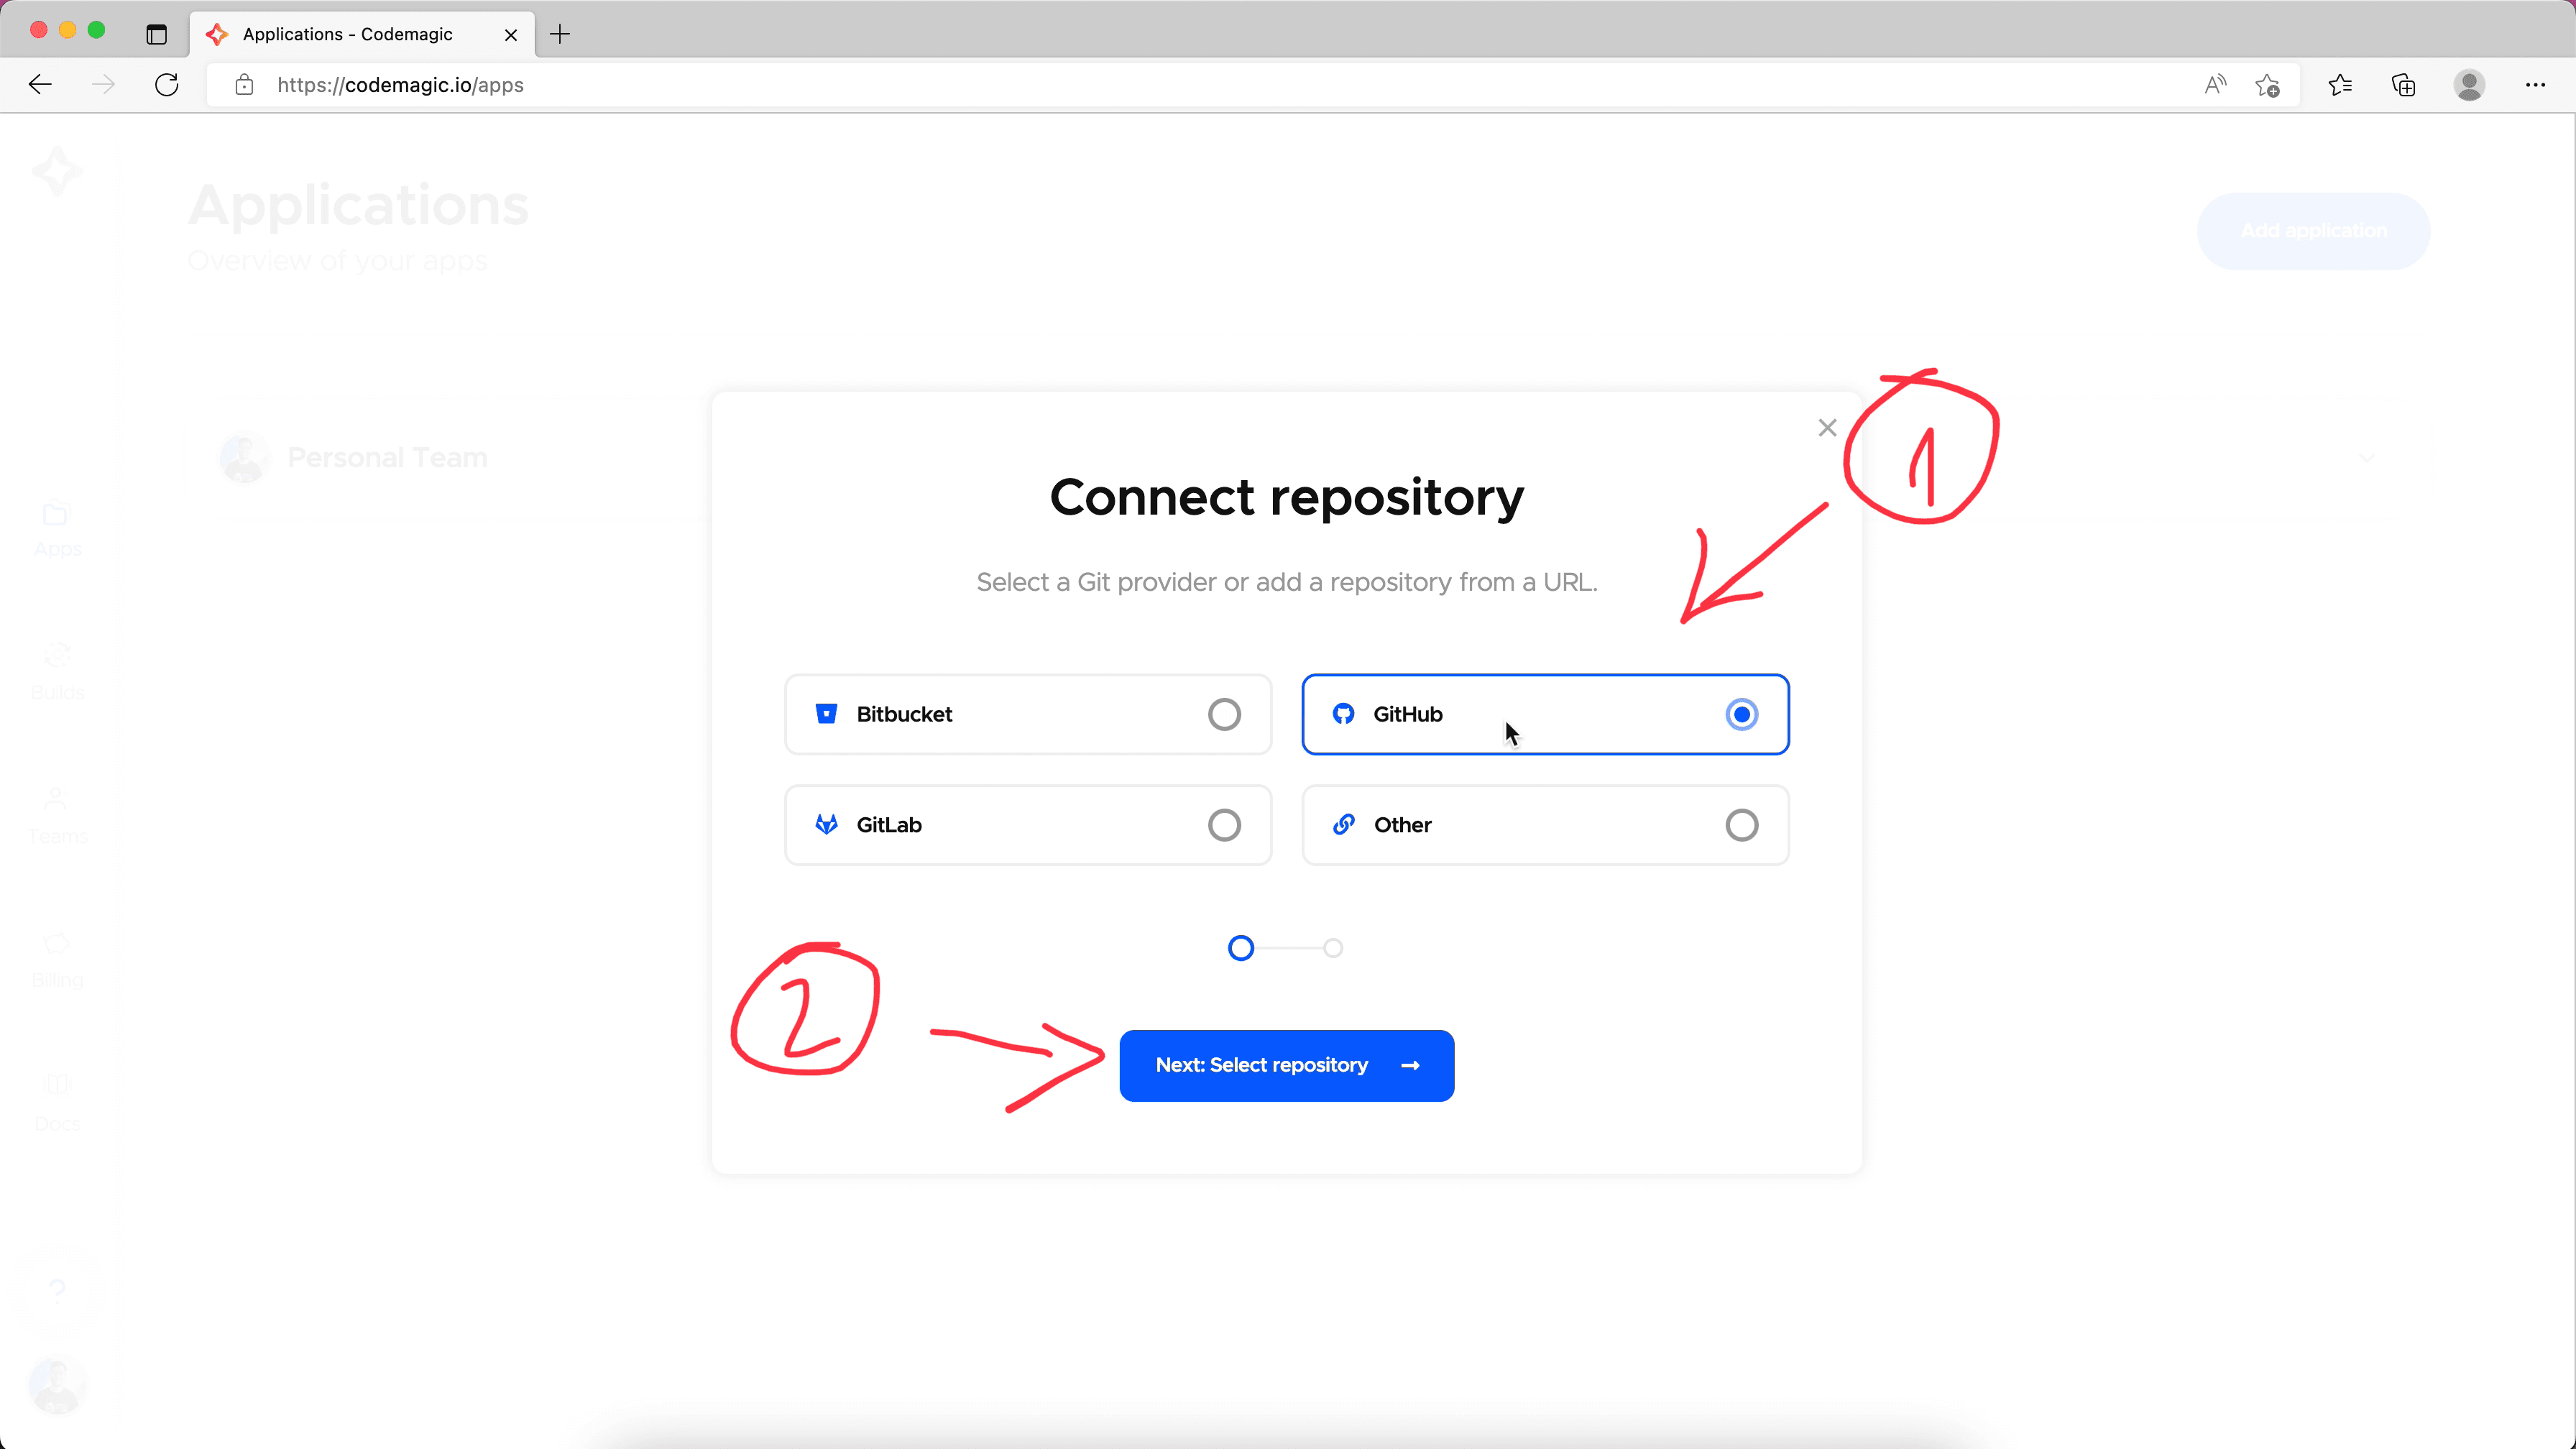
Select a service to fetch the project's code. In this case, I hosted our project on Github, so I selected it and press Next.
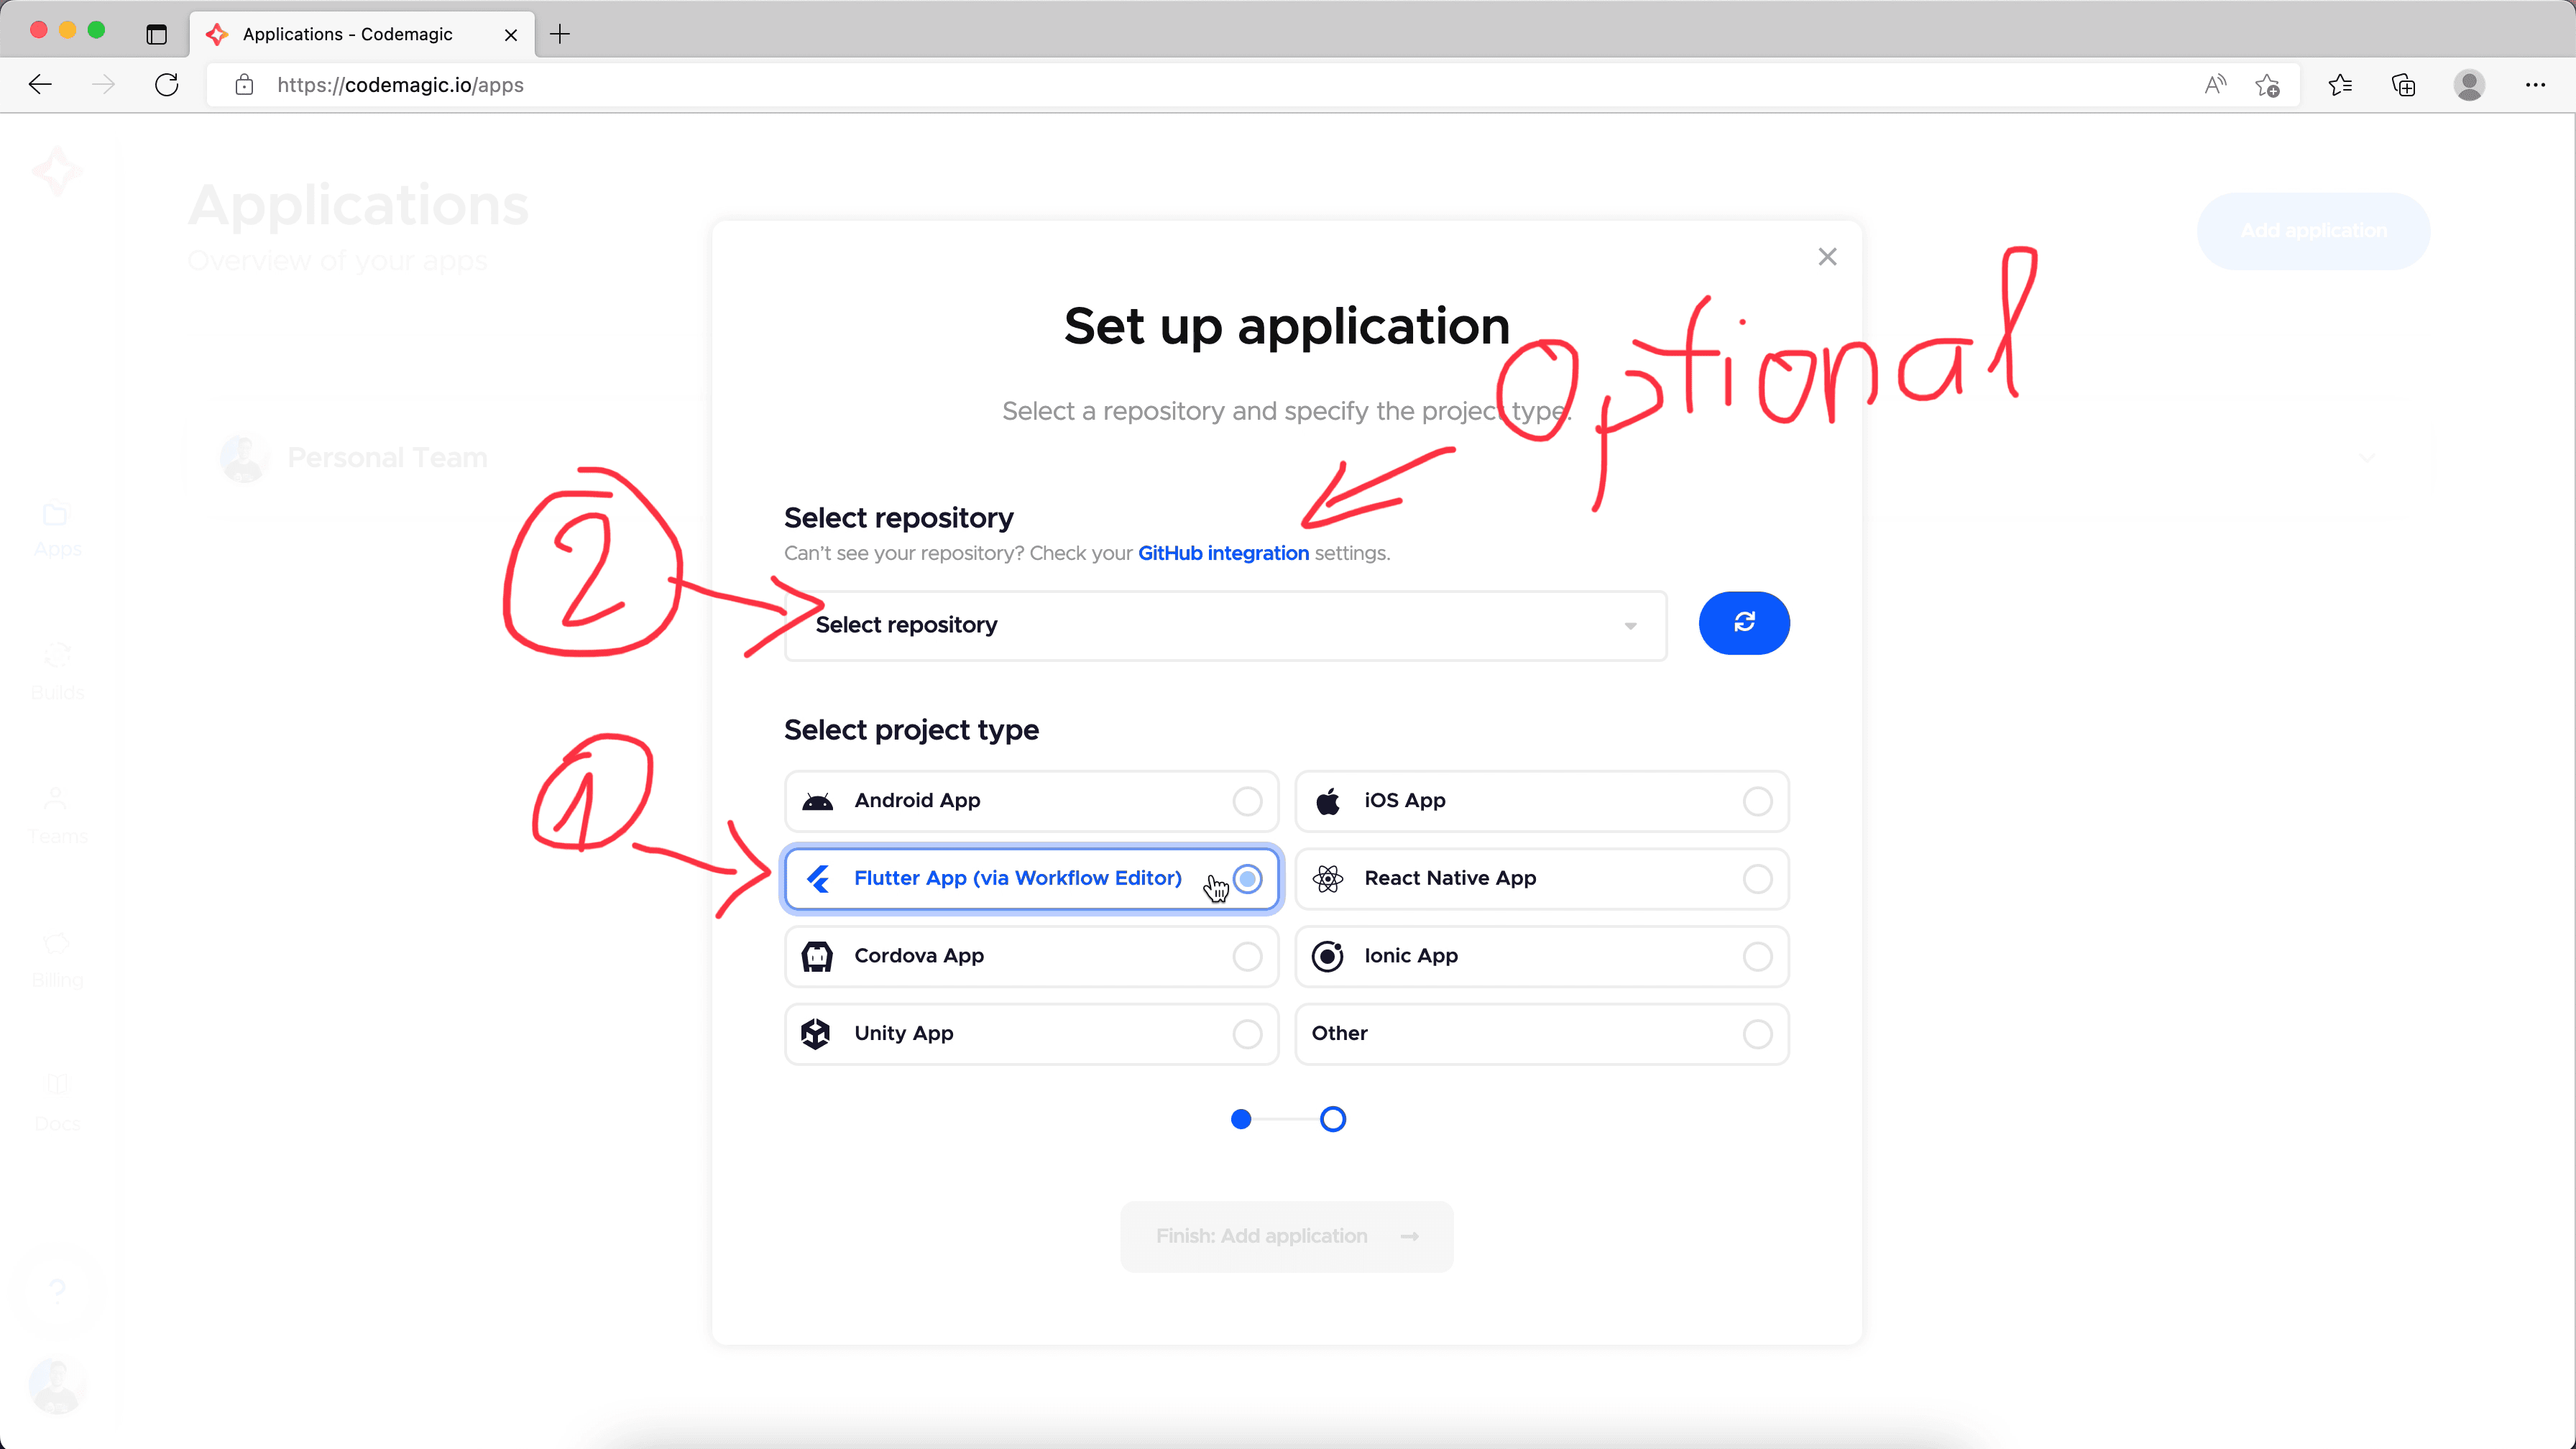
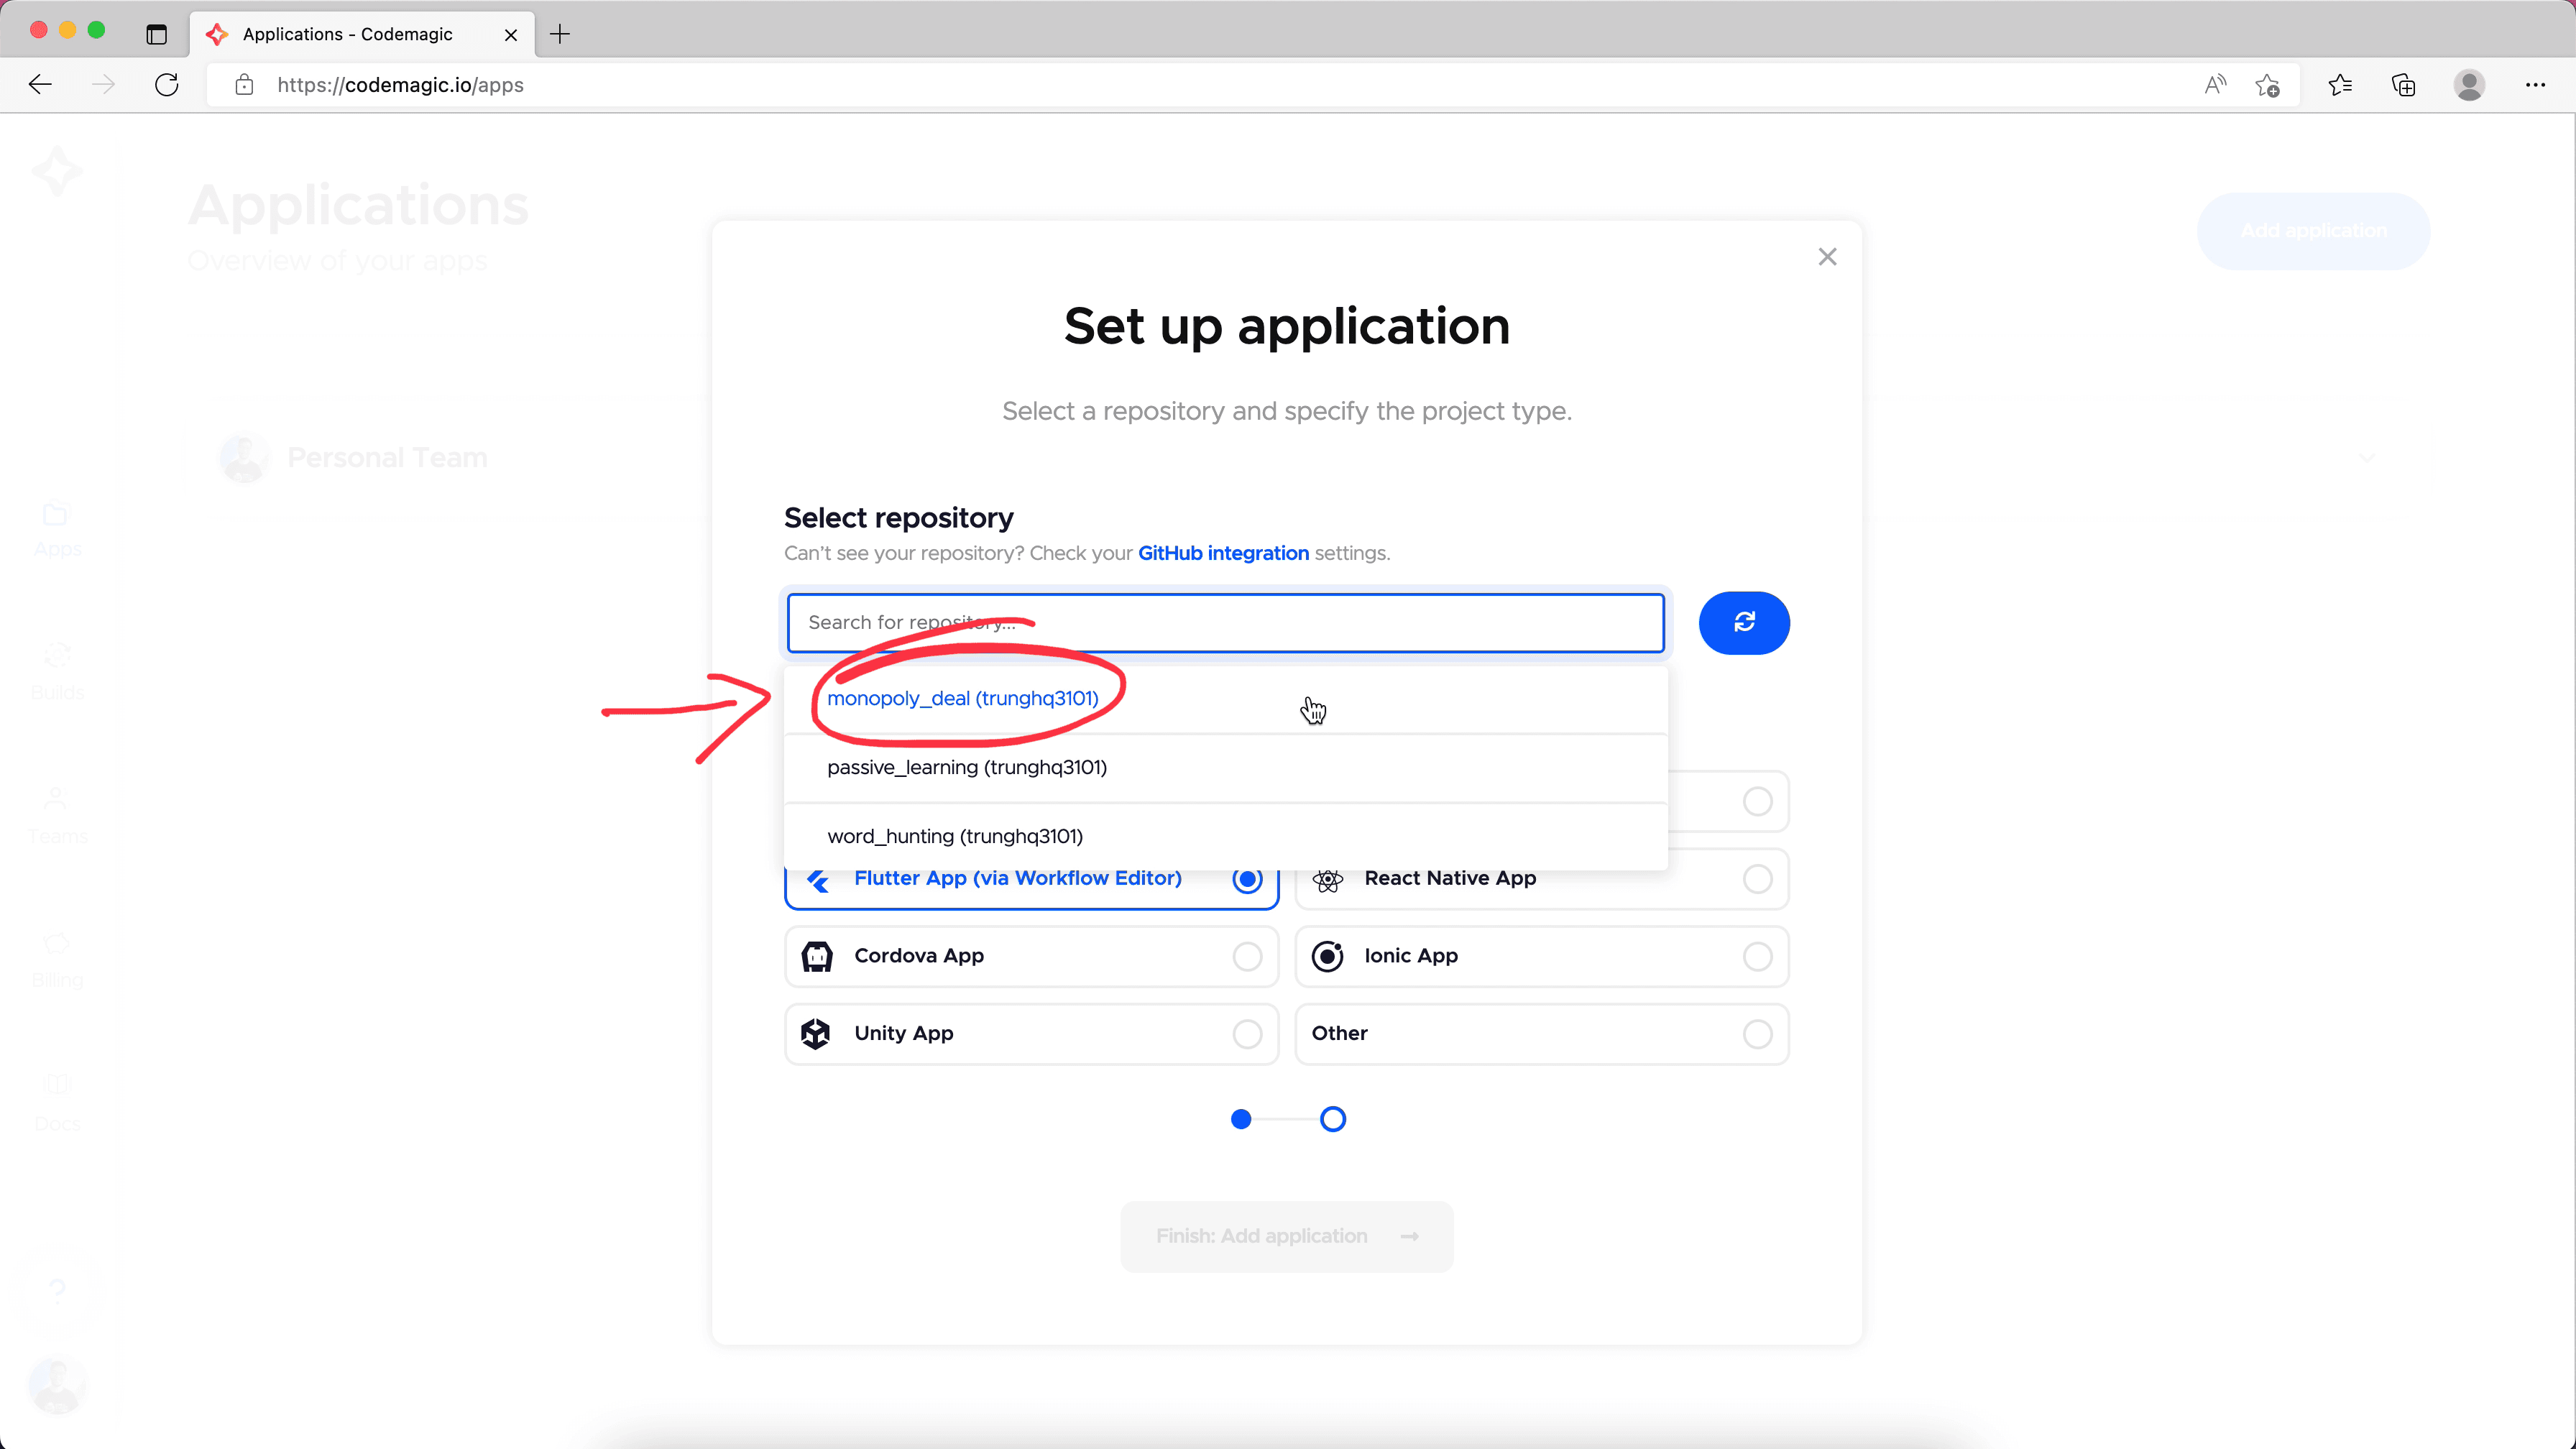
Choose project type Flutter. If you haven't configured Github integration between Codemagic and your Github account yet, you may need to configure it here to be able to see the list of your repositories. Once we completed, just select a proper repository that we want to run the build from it. Then press Finish button.
We will land on the workflow settings page. We will configure how the build pipeline happen here. Wa want to build this game to Web first, it helps the game to be available immediately to everyone. For Android and iOS, we must setup Firebase App Distribution to distribute the app to testers' devices. I think we can leave them later.
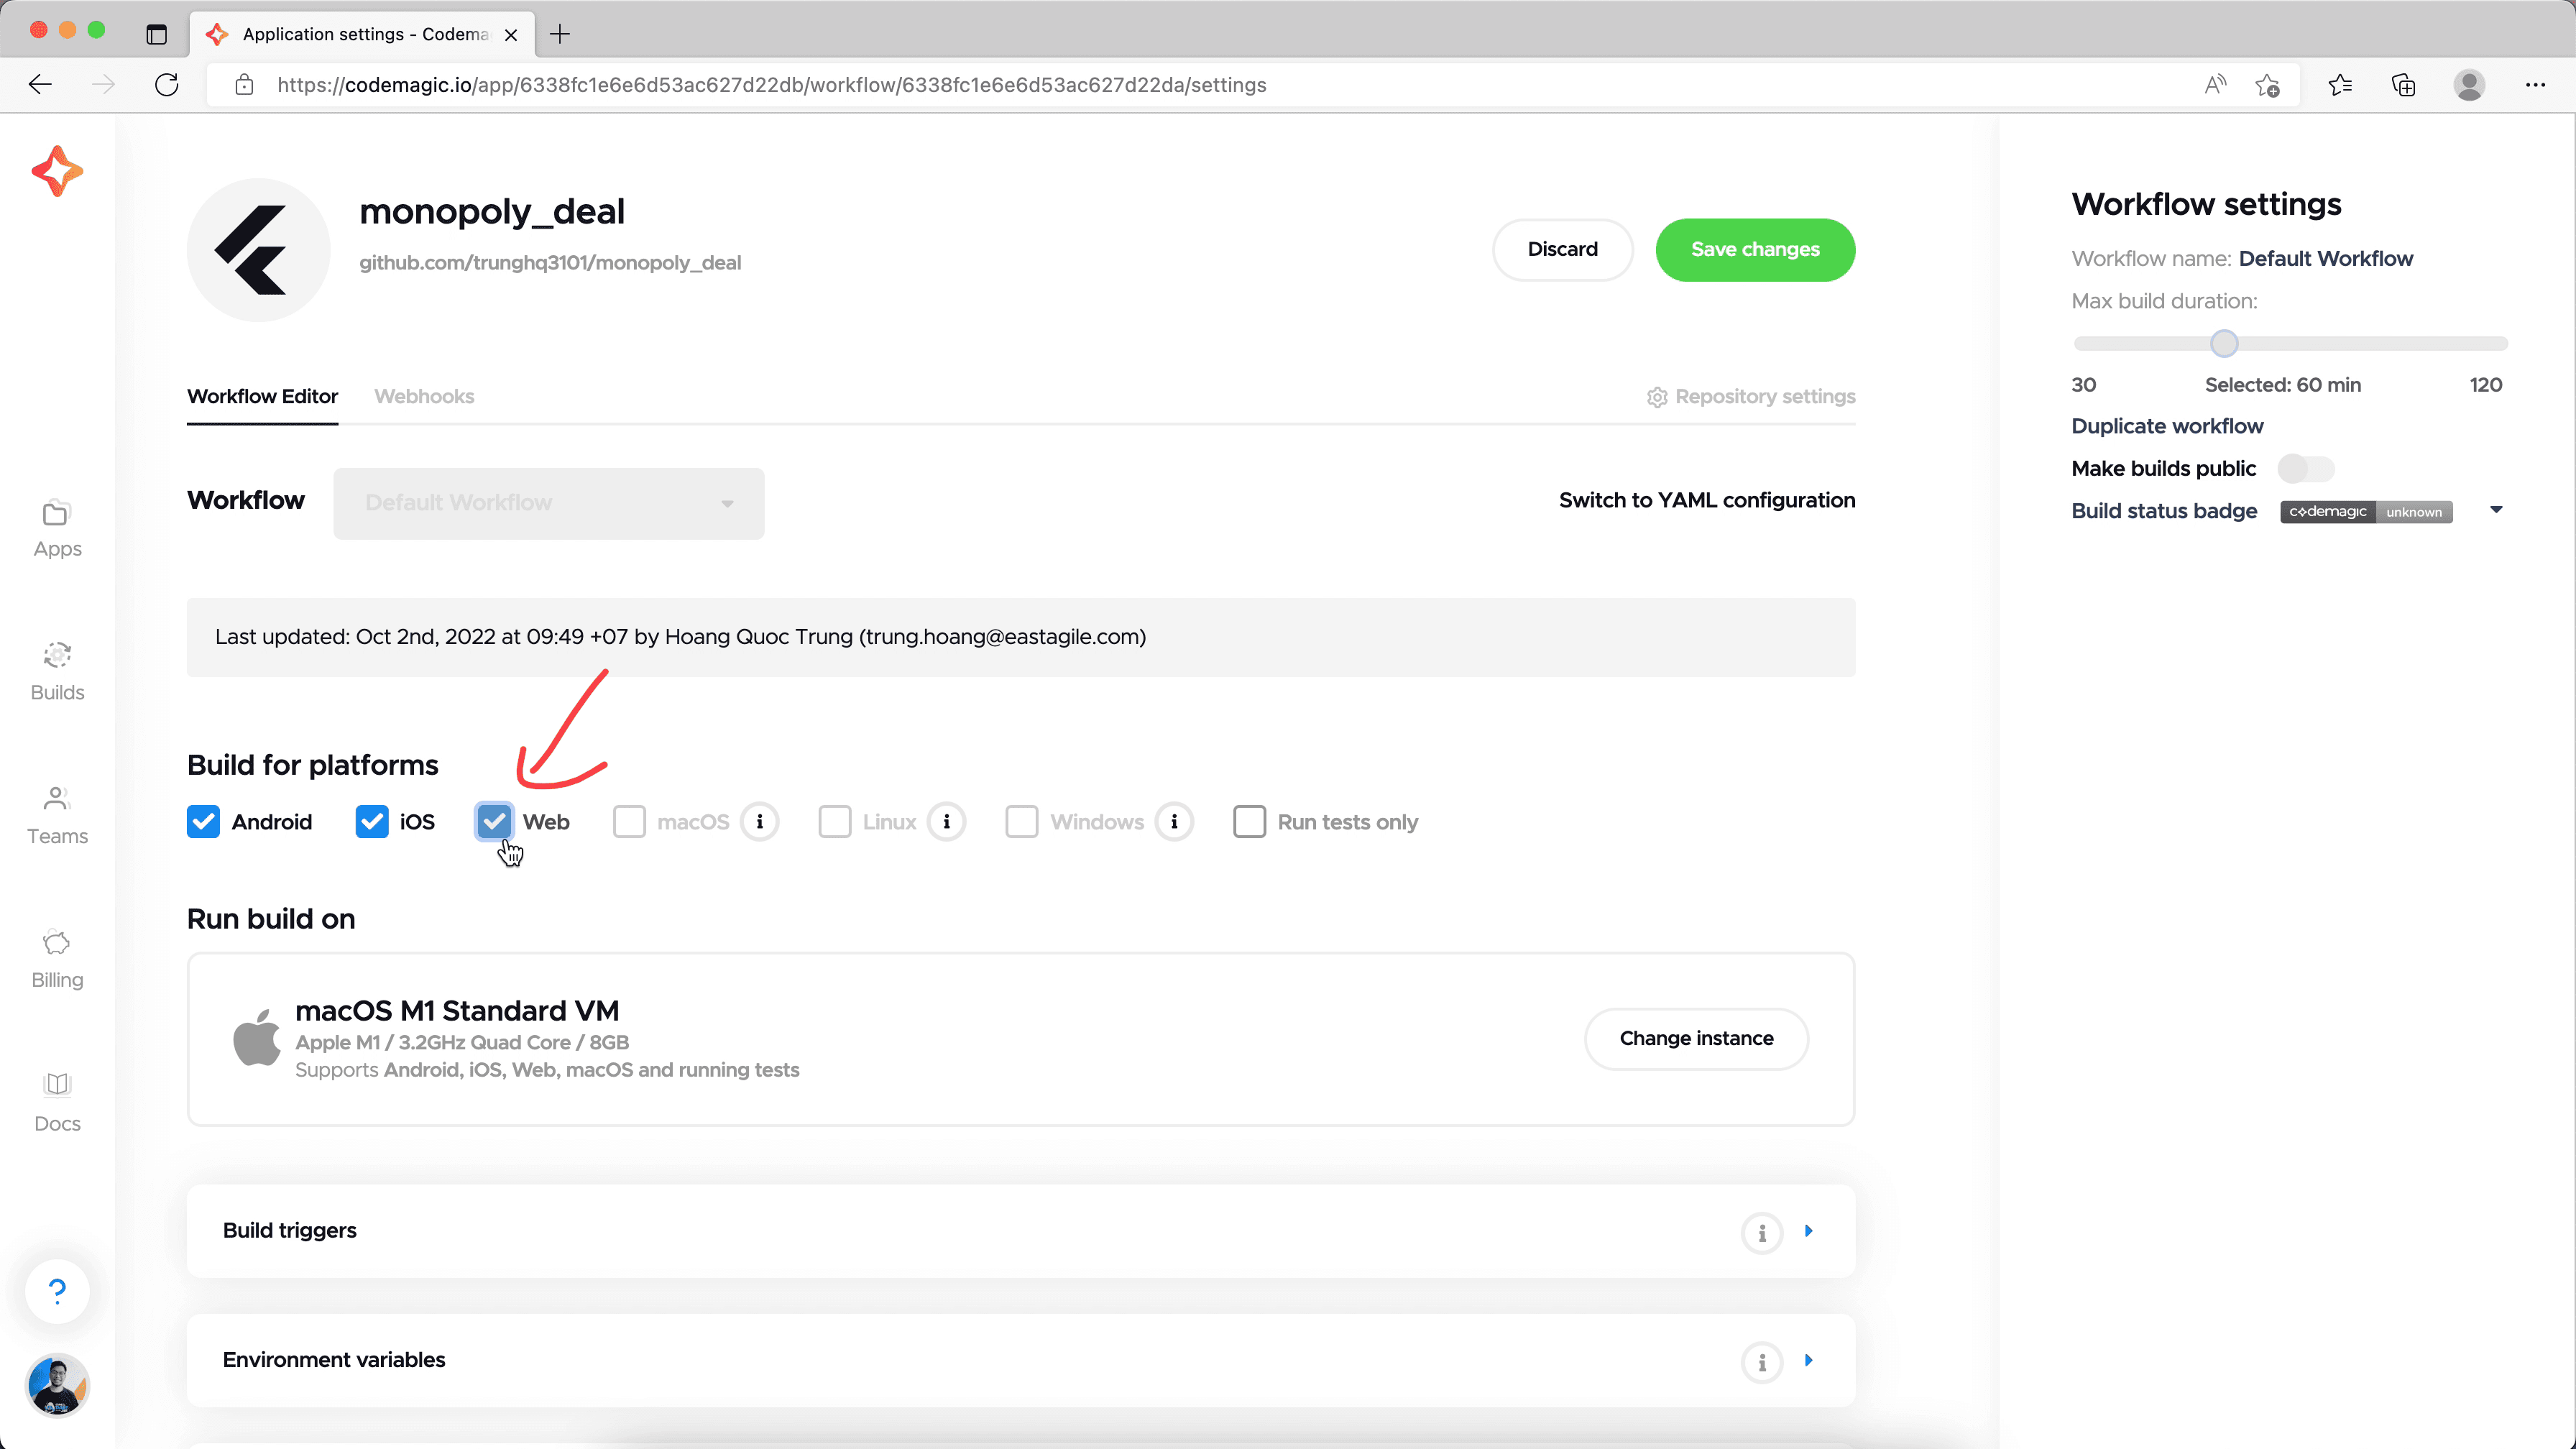
Then, we click on the Build triggers box below. It will expand. Here, we configure at which conditions we want to trigger the build pipeline automatically. In this case, we want to run everytime we push a new commit to the master branch. So, we tick on Trigger on push checkbox.
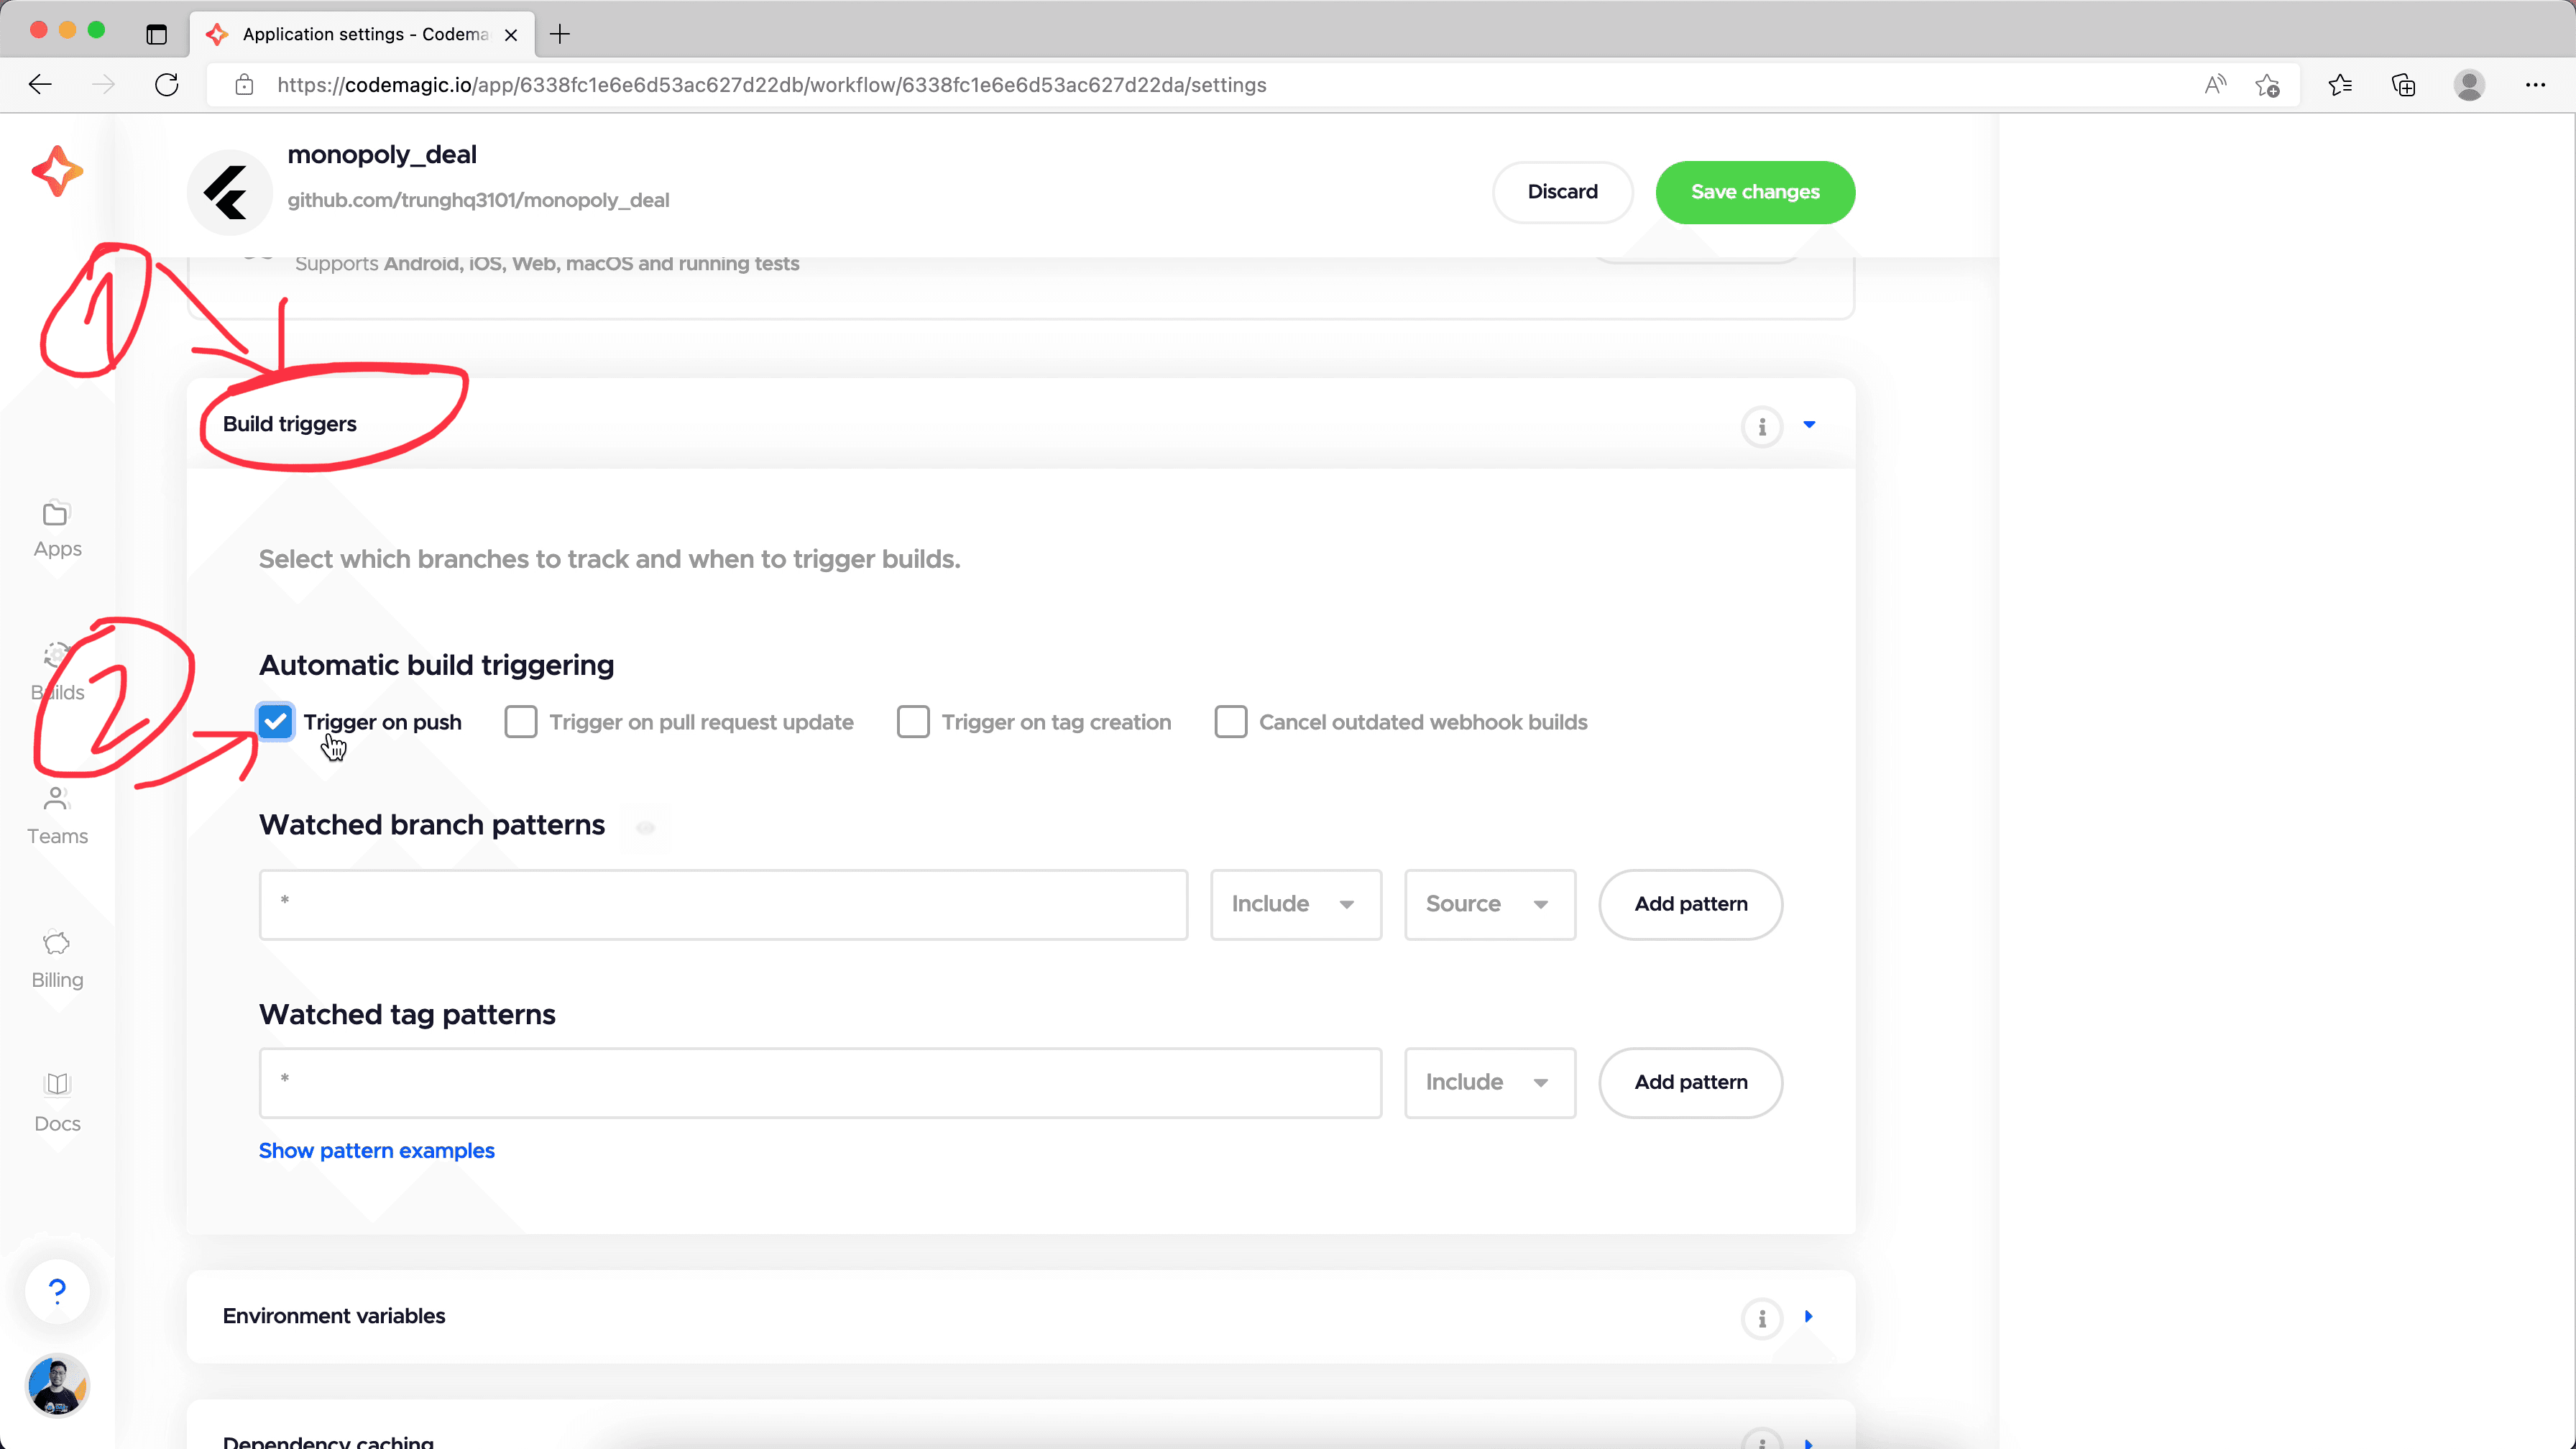
Then, fill in the branch name, which is master. And click Add pattern button to actually write it to the configuration.
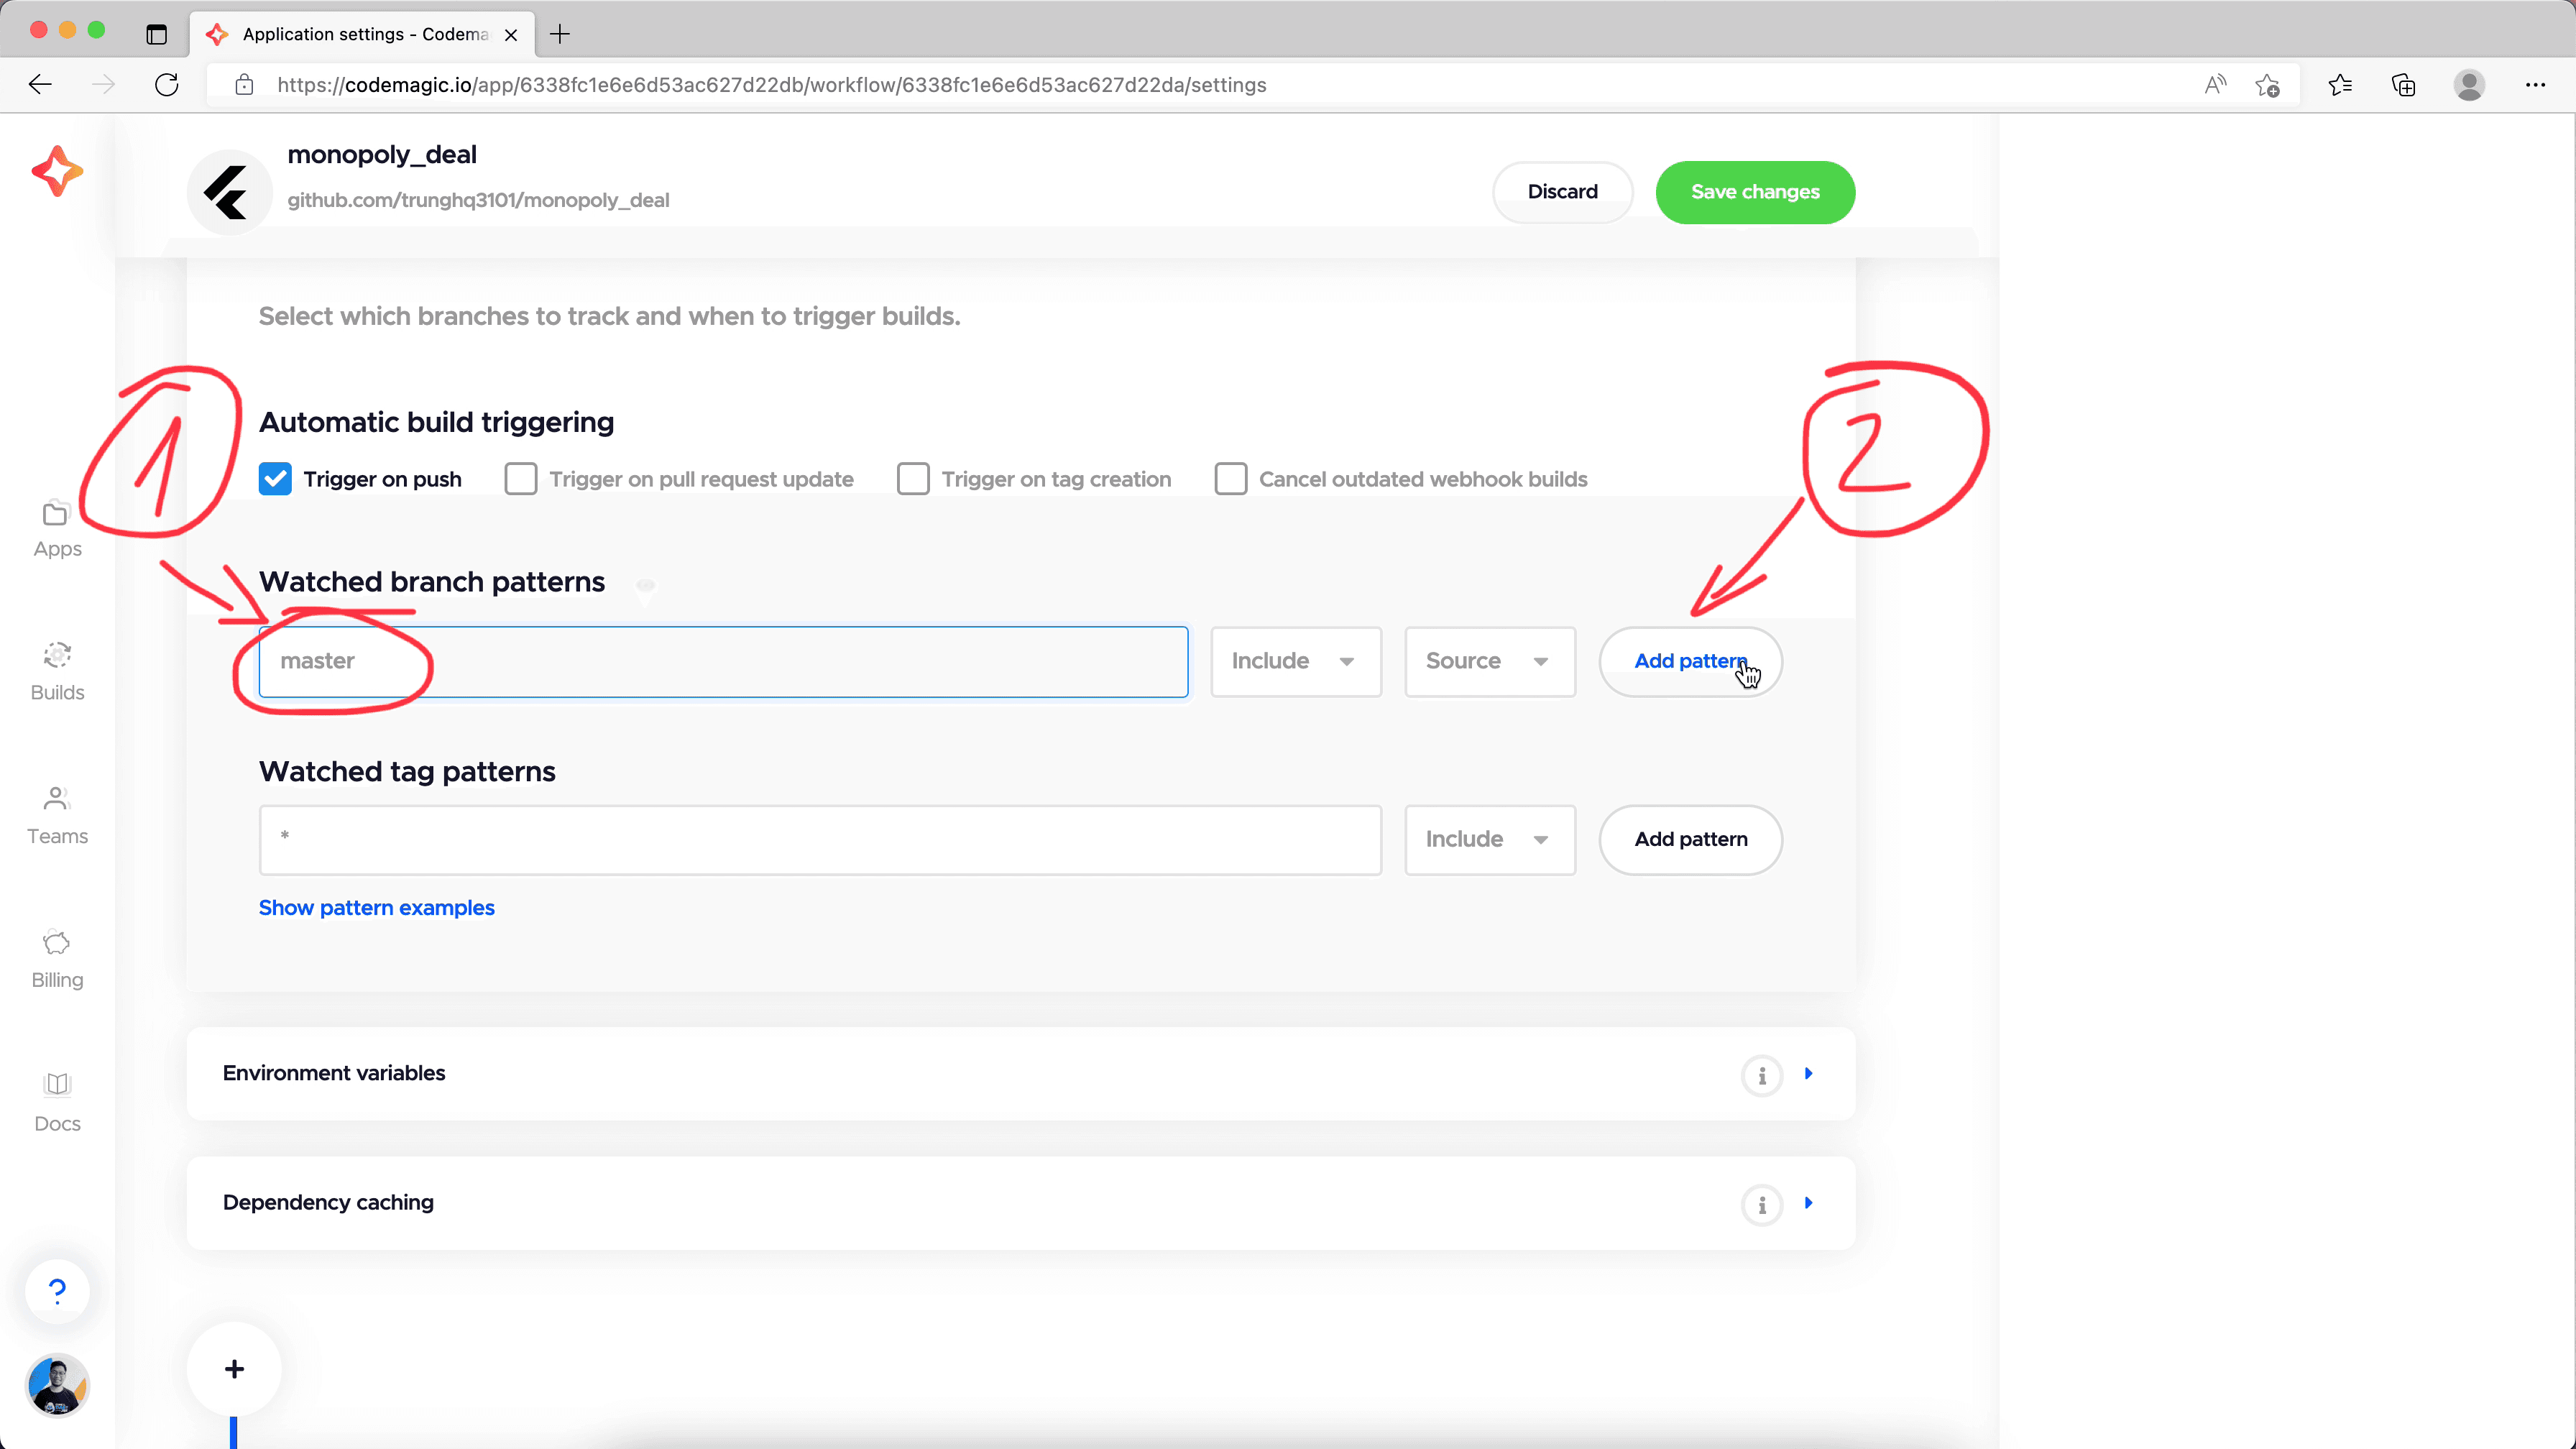
Next, we skip the Environment variables and Dependency caching boxes for now. We expand the Tests box below them. Then, we expand the Static code analysis sub-box. Here, we turn on the Enable Flutter analyzer option to run flutter analyze command in the build process. This command will check for the code format to detect if any lint rules we didn't follow. It enforces consistent code quality for the release build. If this check fails, the build pipeline will fail too.
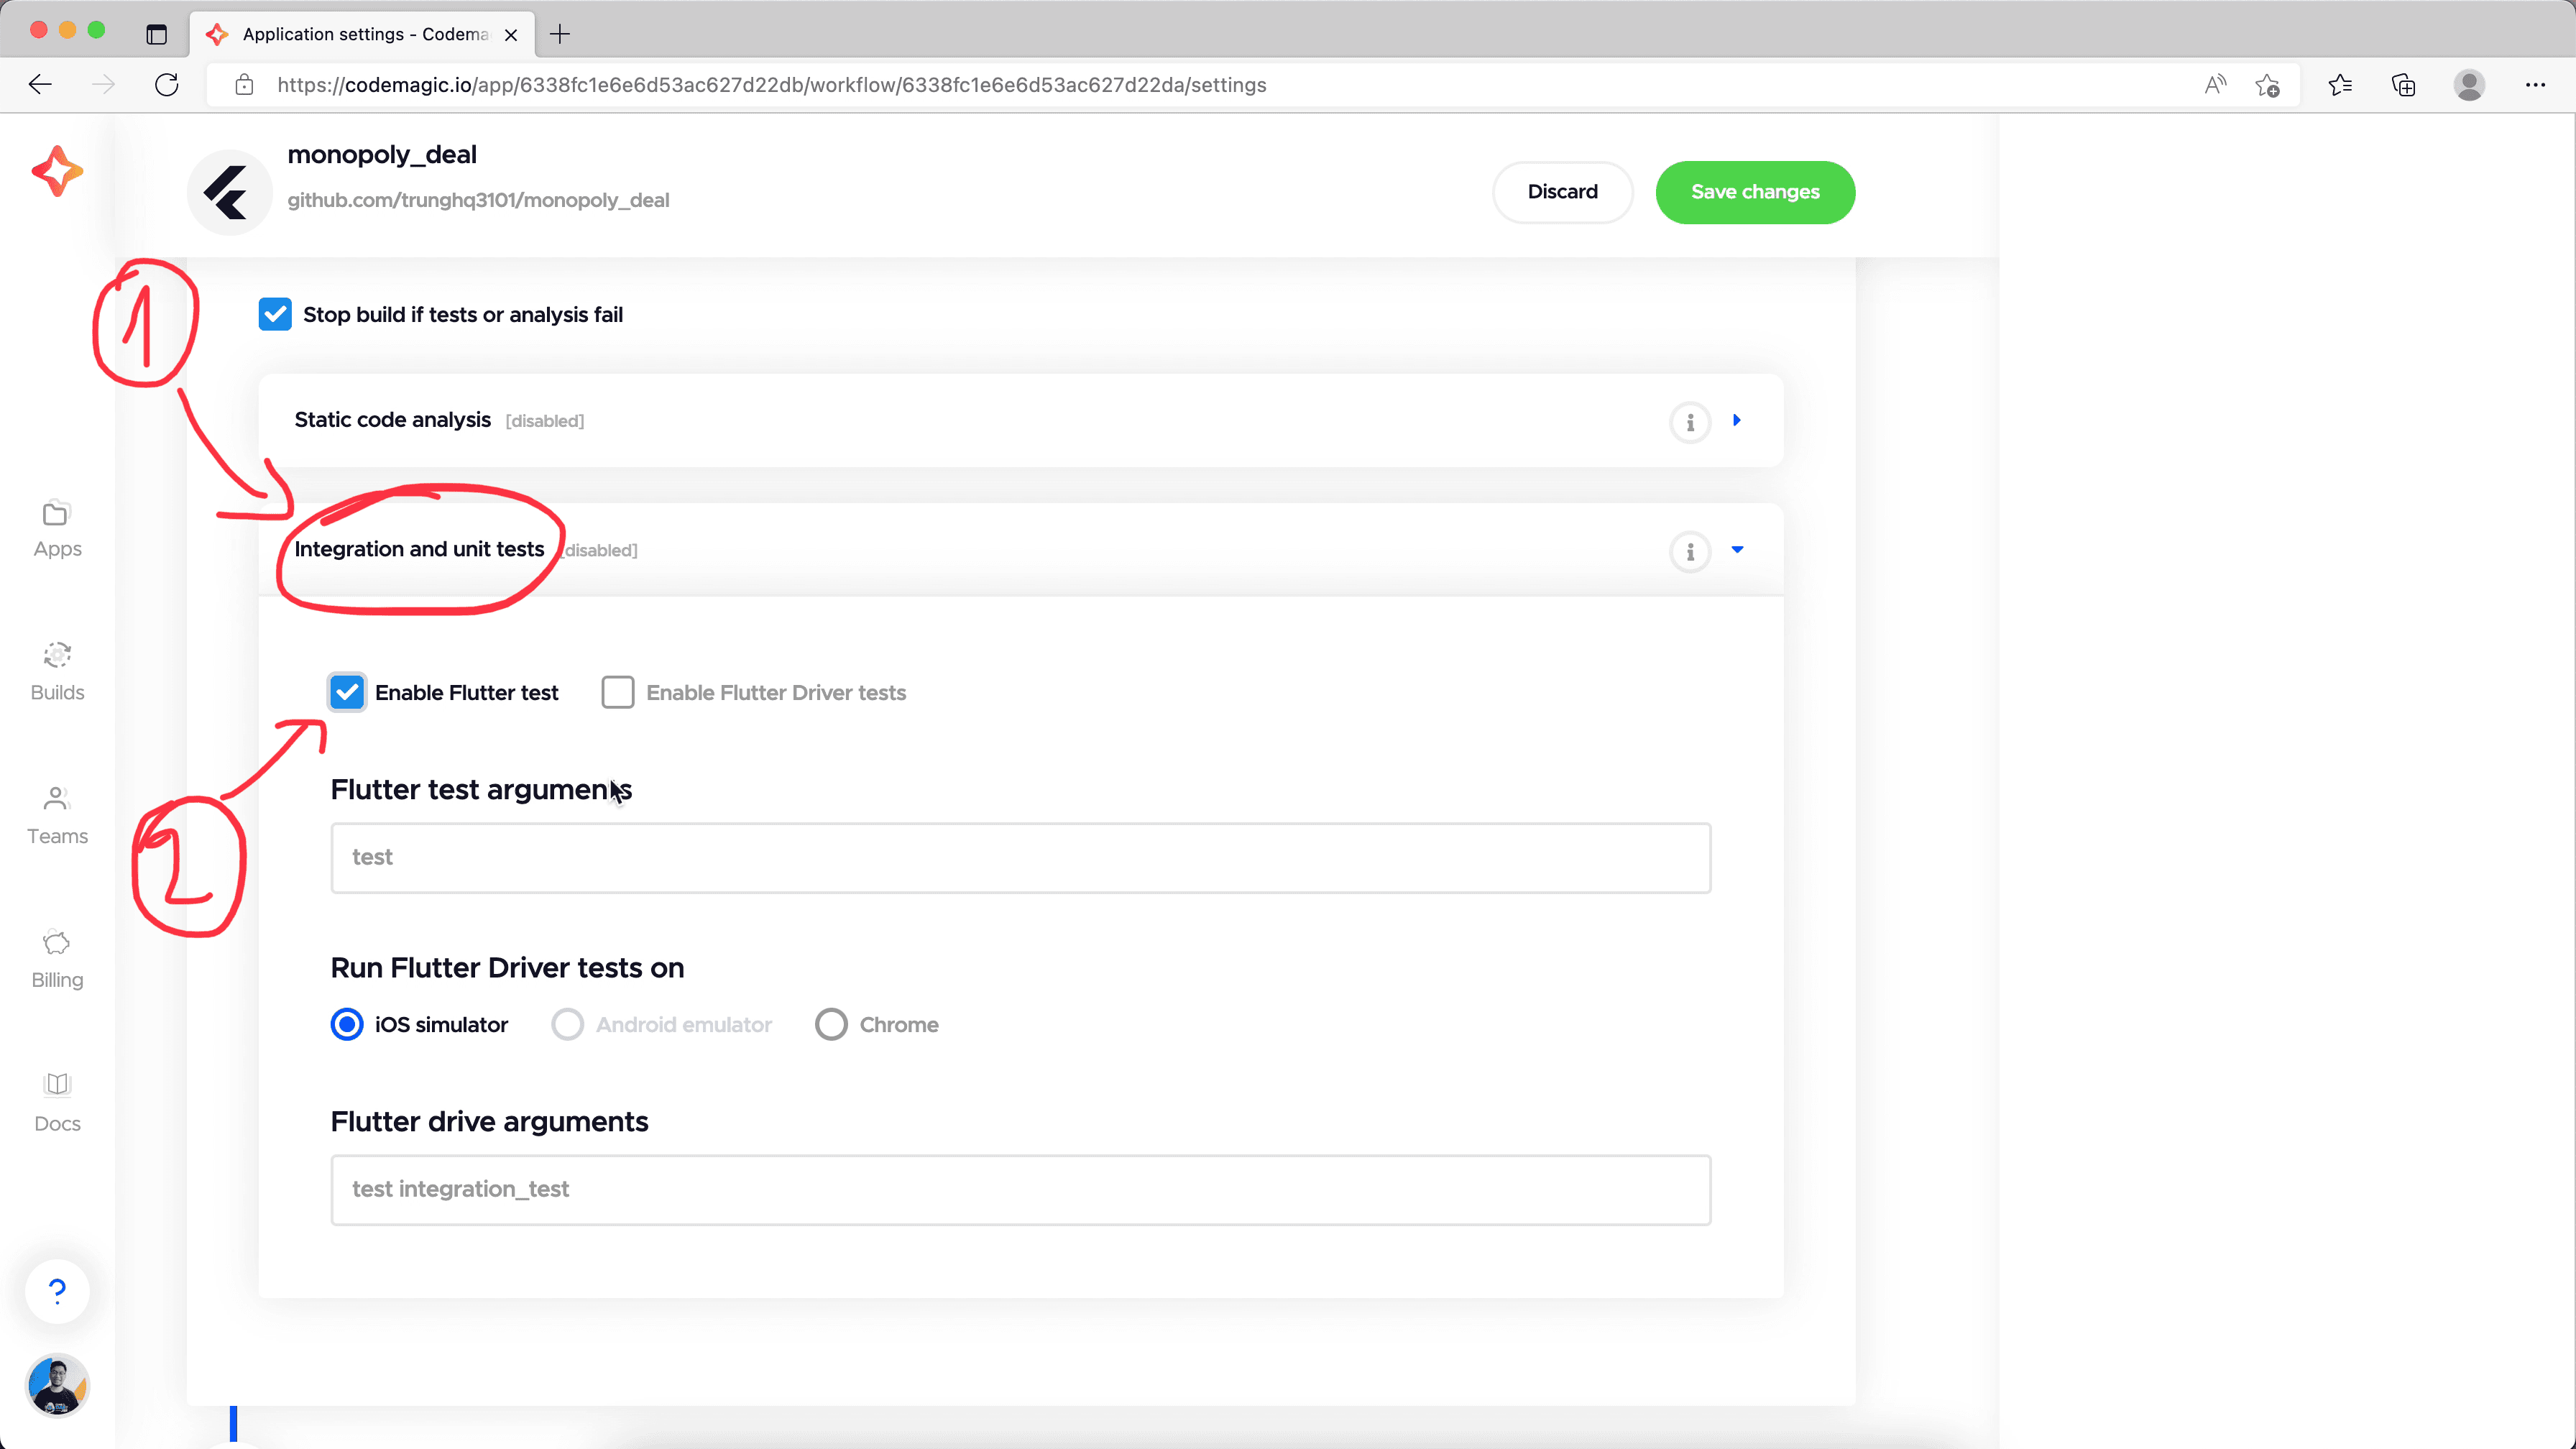
Then, we expand the Interation and unit tests sub-box below. Here, we want to check on the Enable Flutter test option. It ensures all the unit tests must pass so that the build can pass. We can also check on the Enable Flutter Driver test option to run all the integration tests, but I skip it for now to have the build run faster.
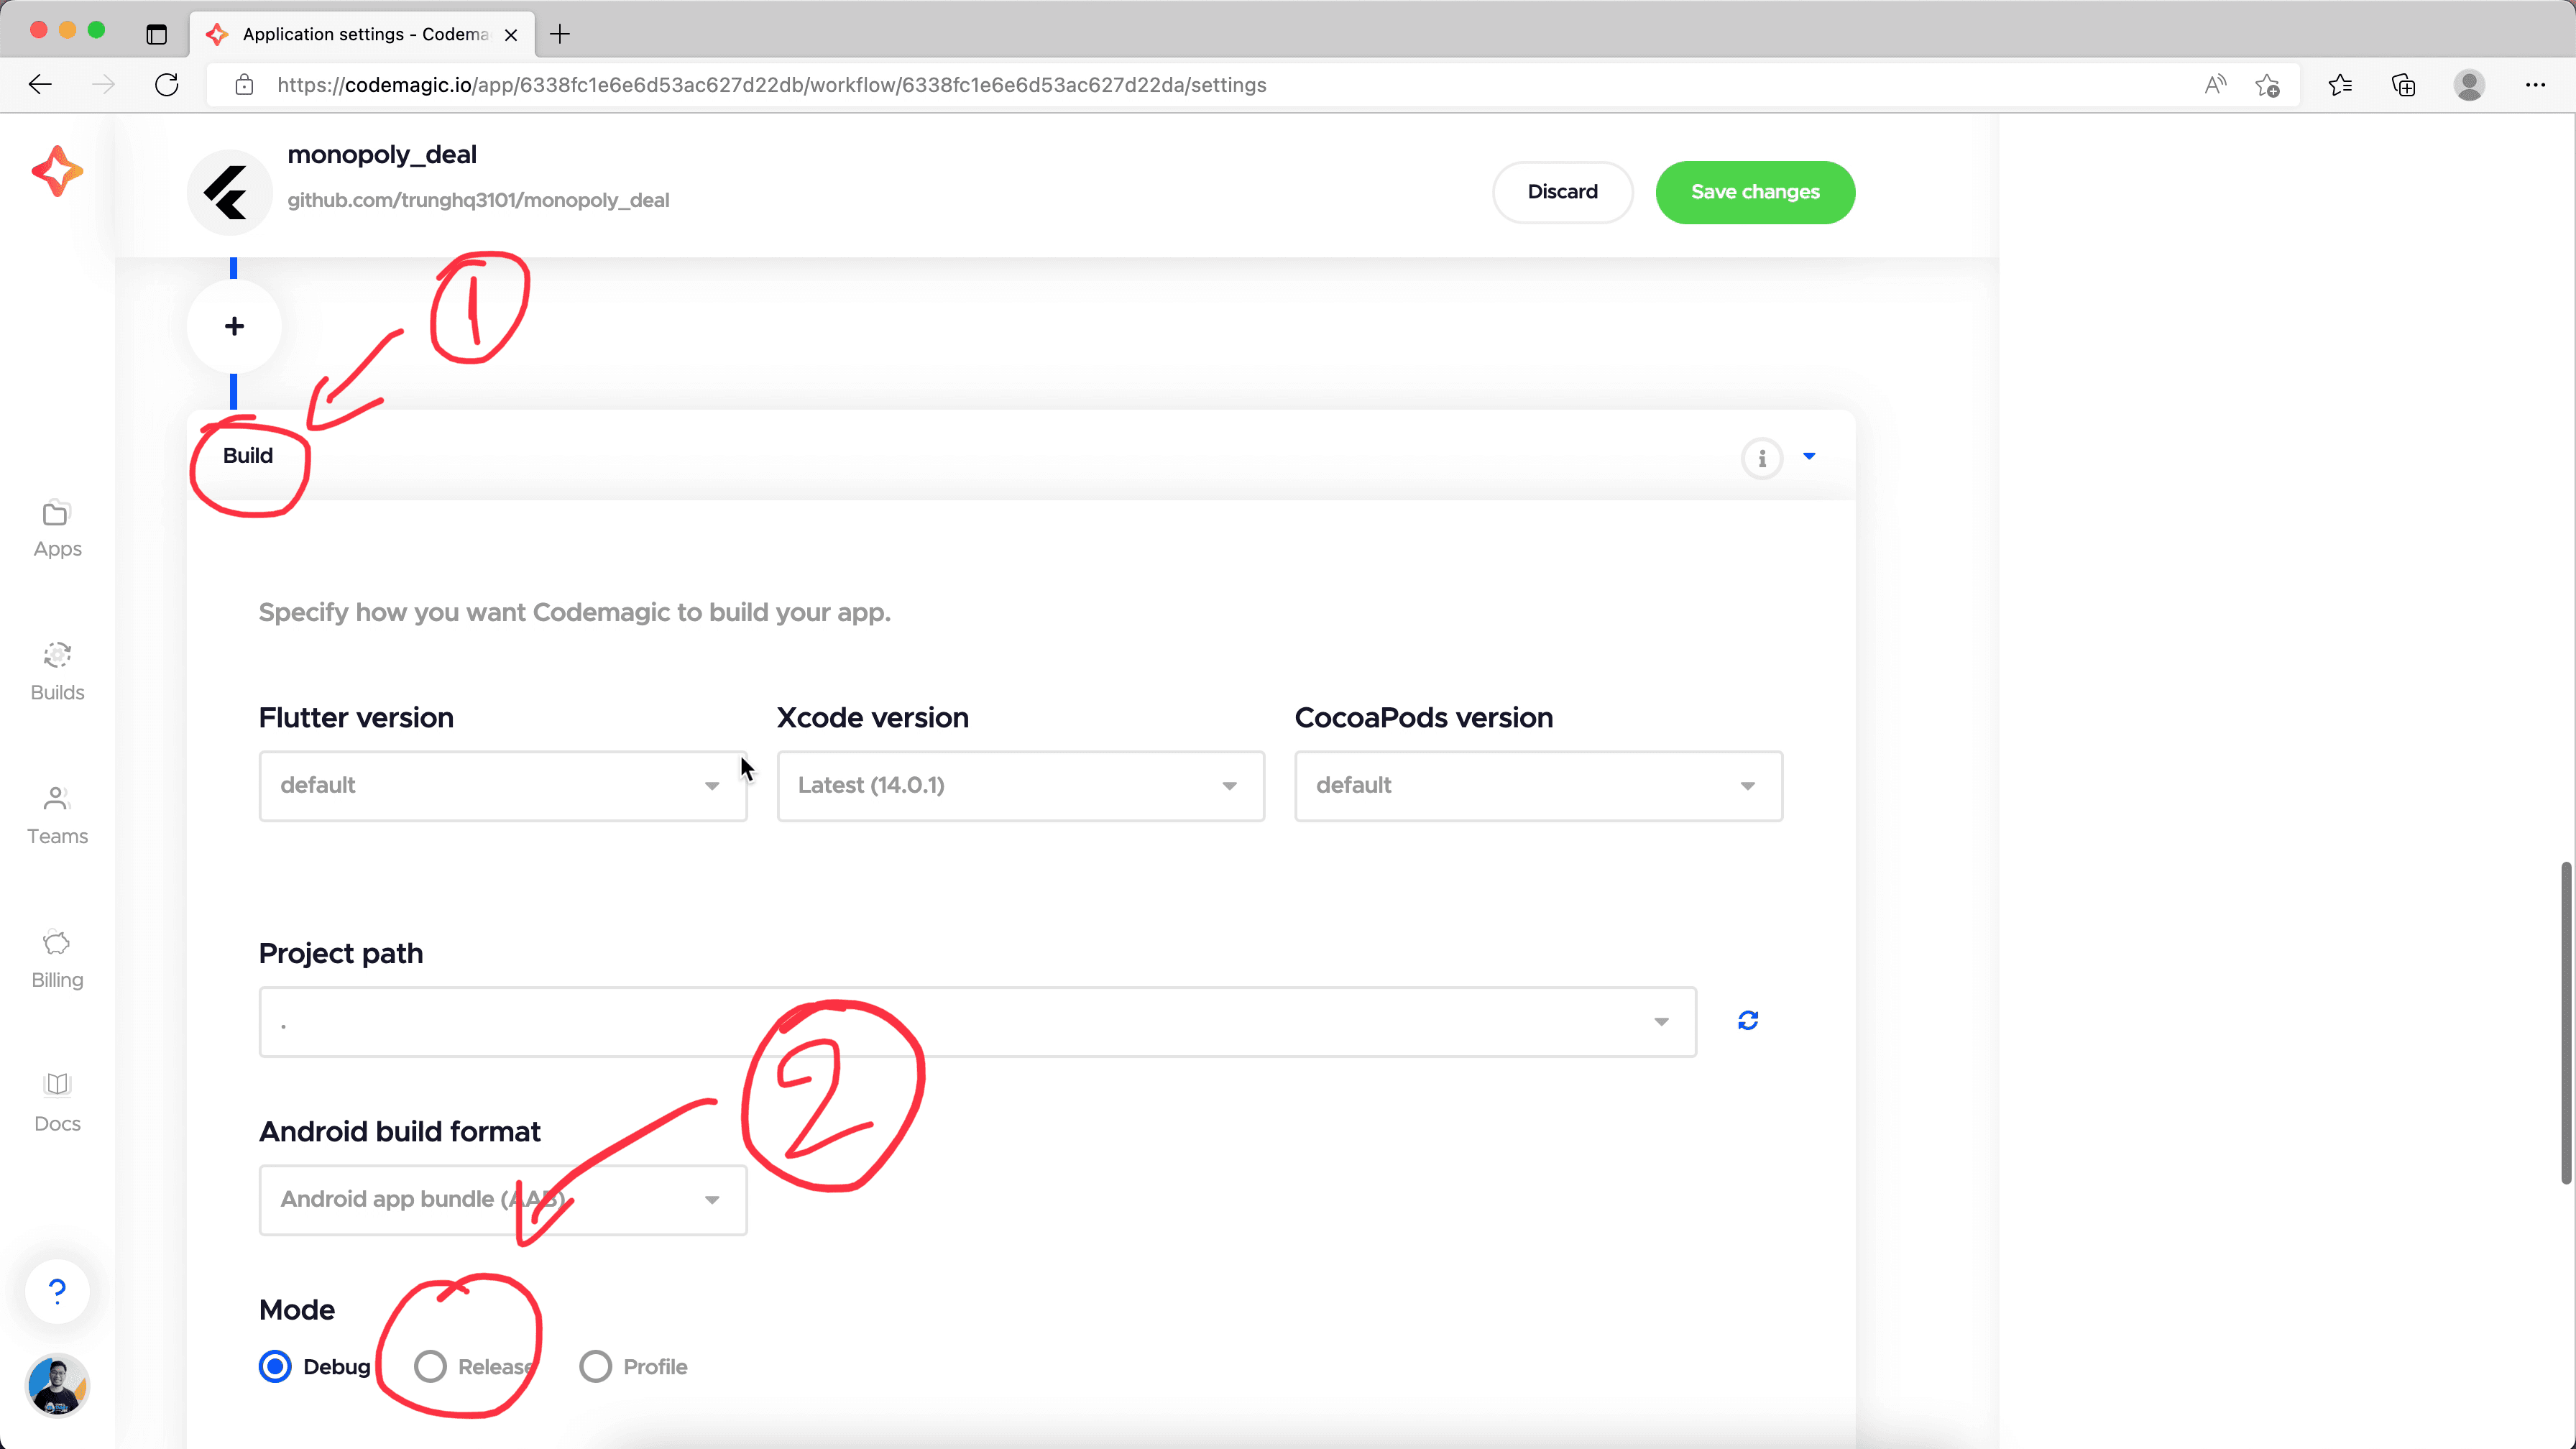
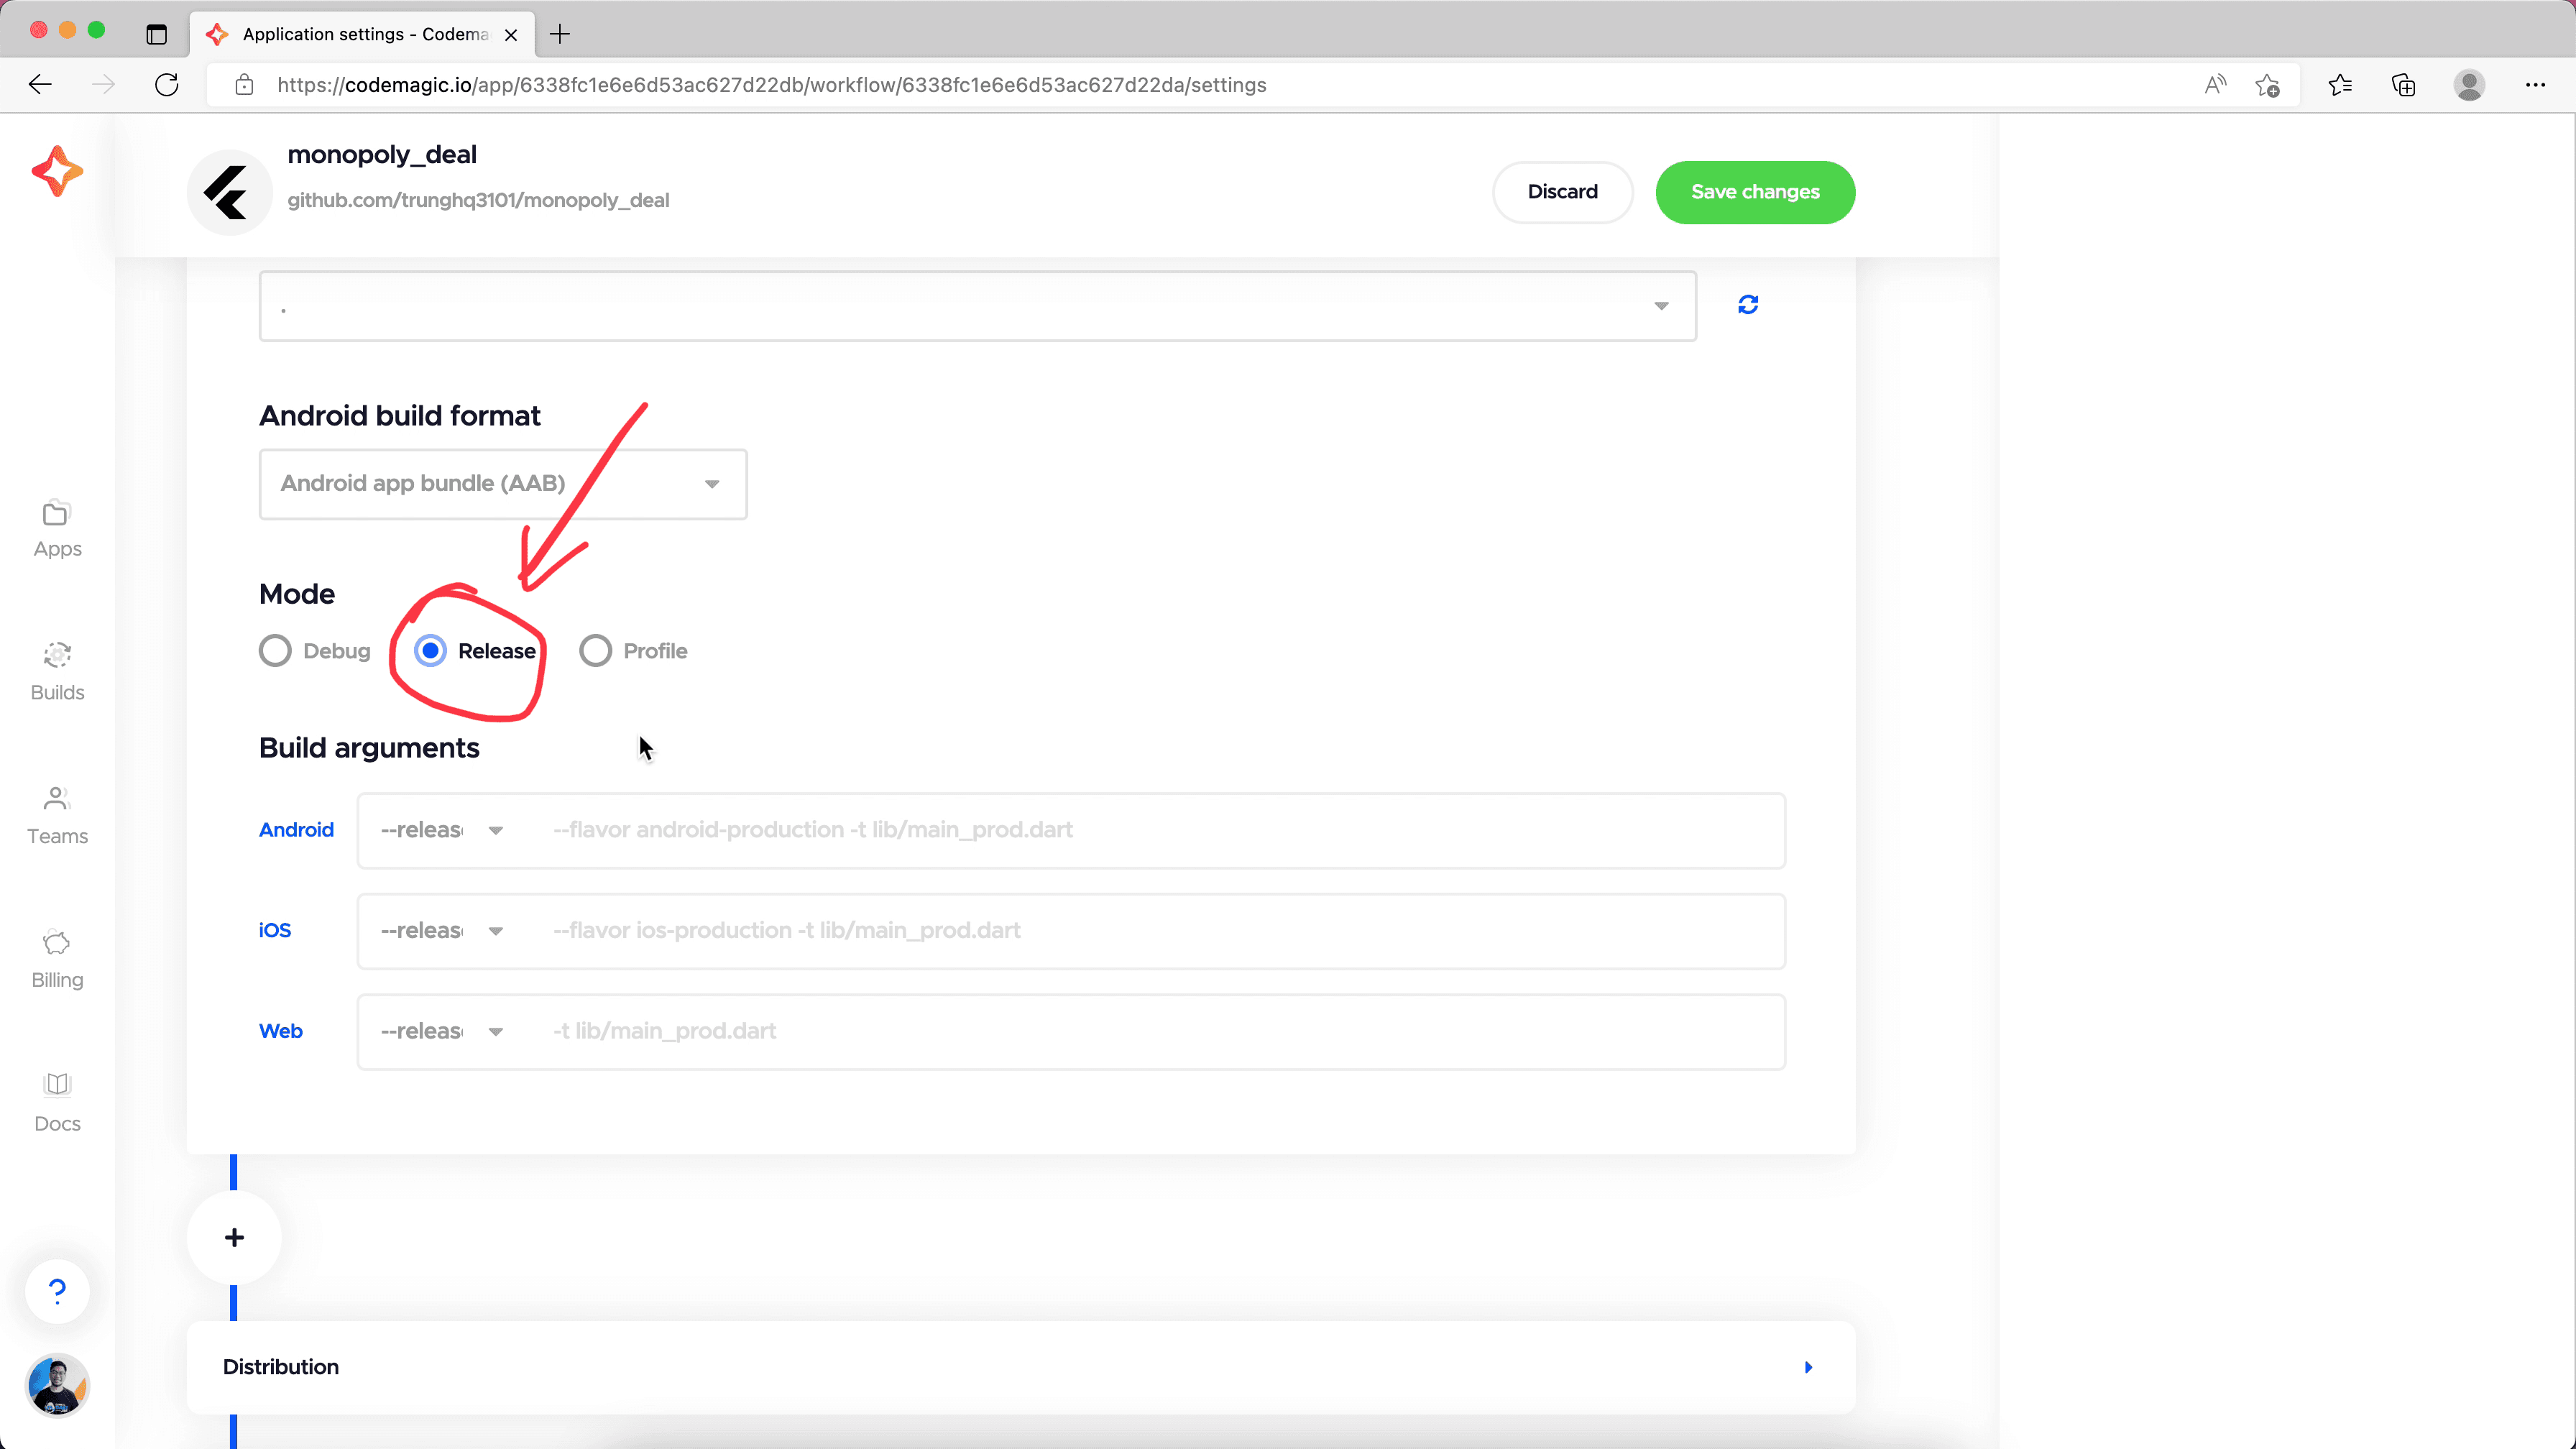
Next, we go to the next box. In this Build section, we choose Release build mode because we want to see how our game works in production.
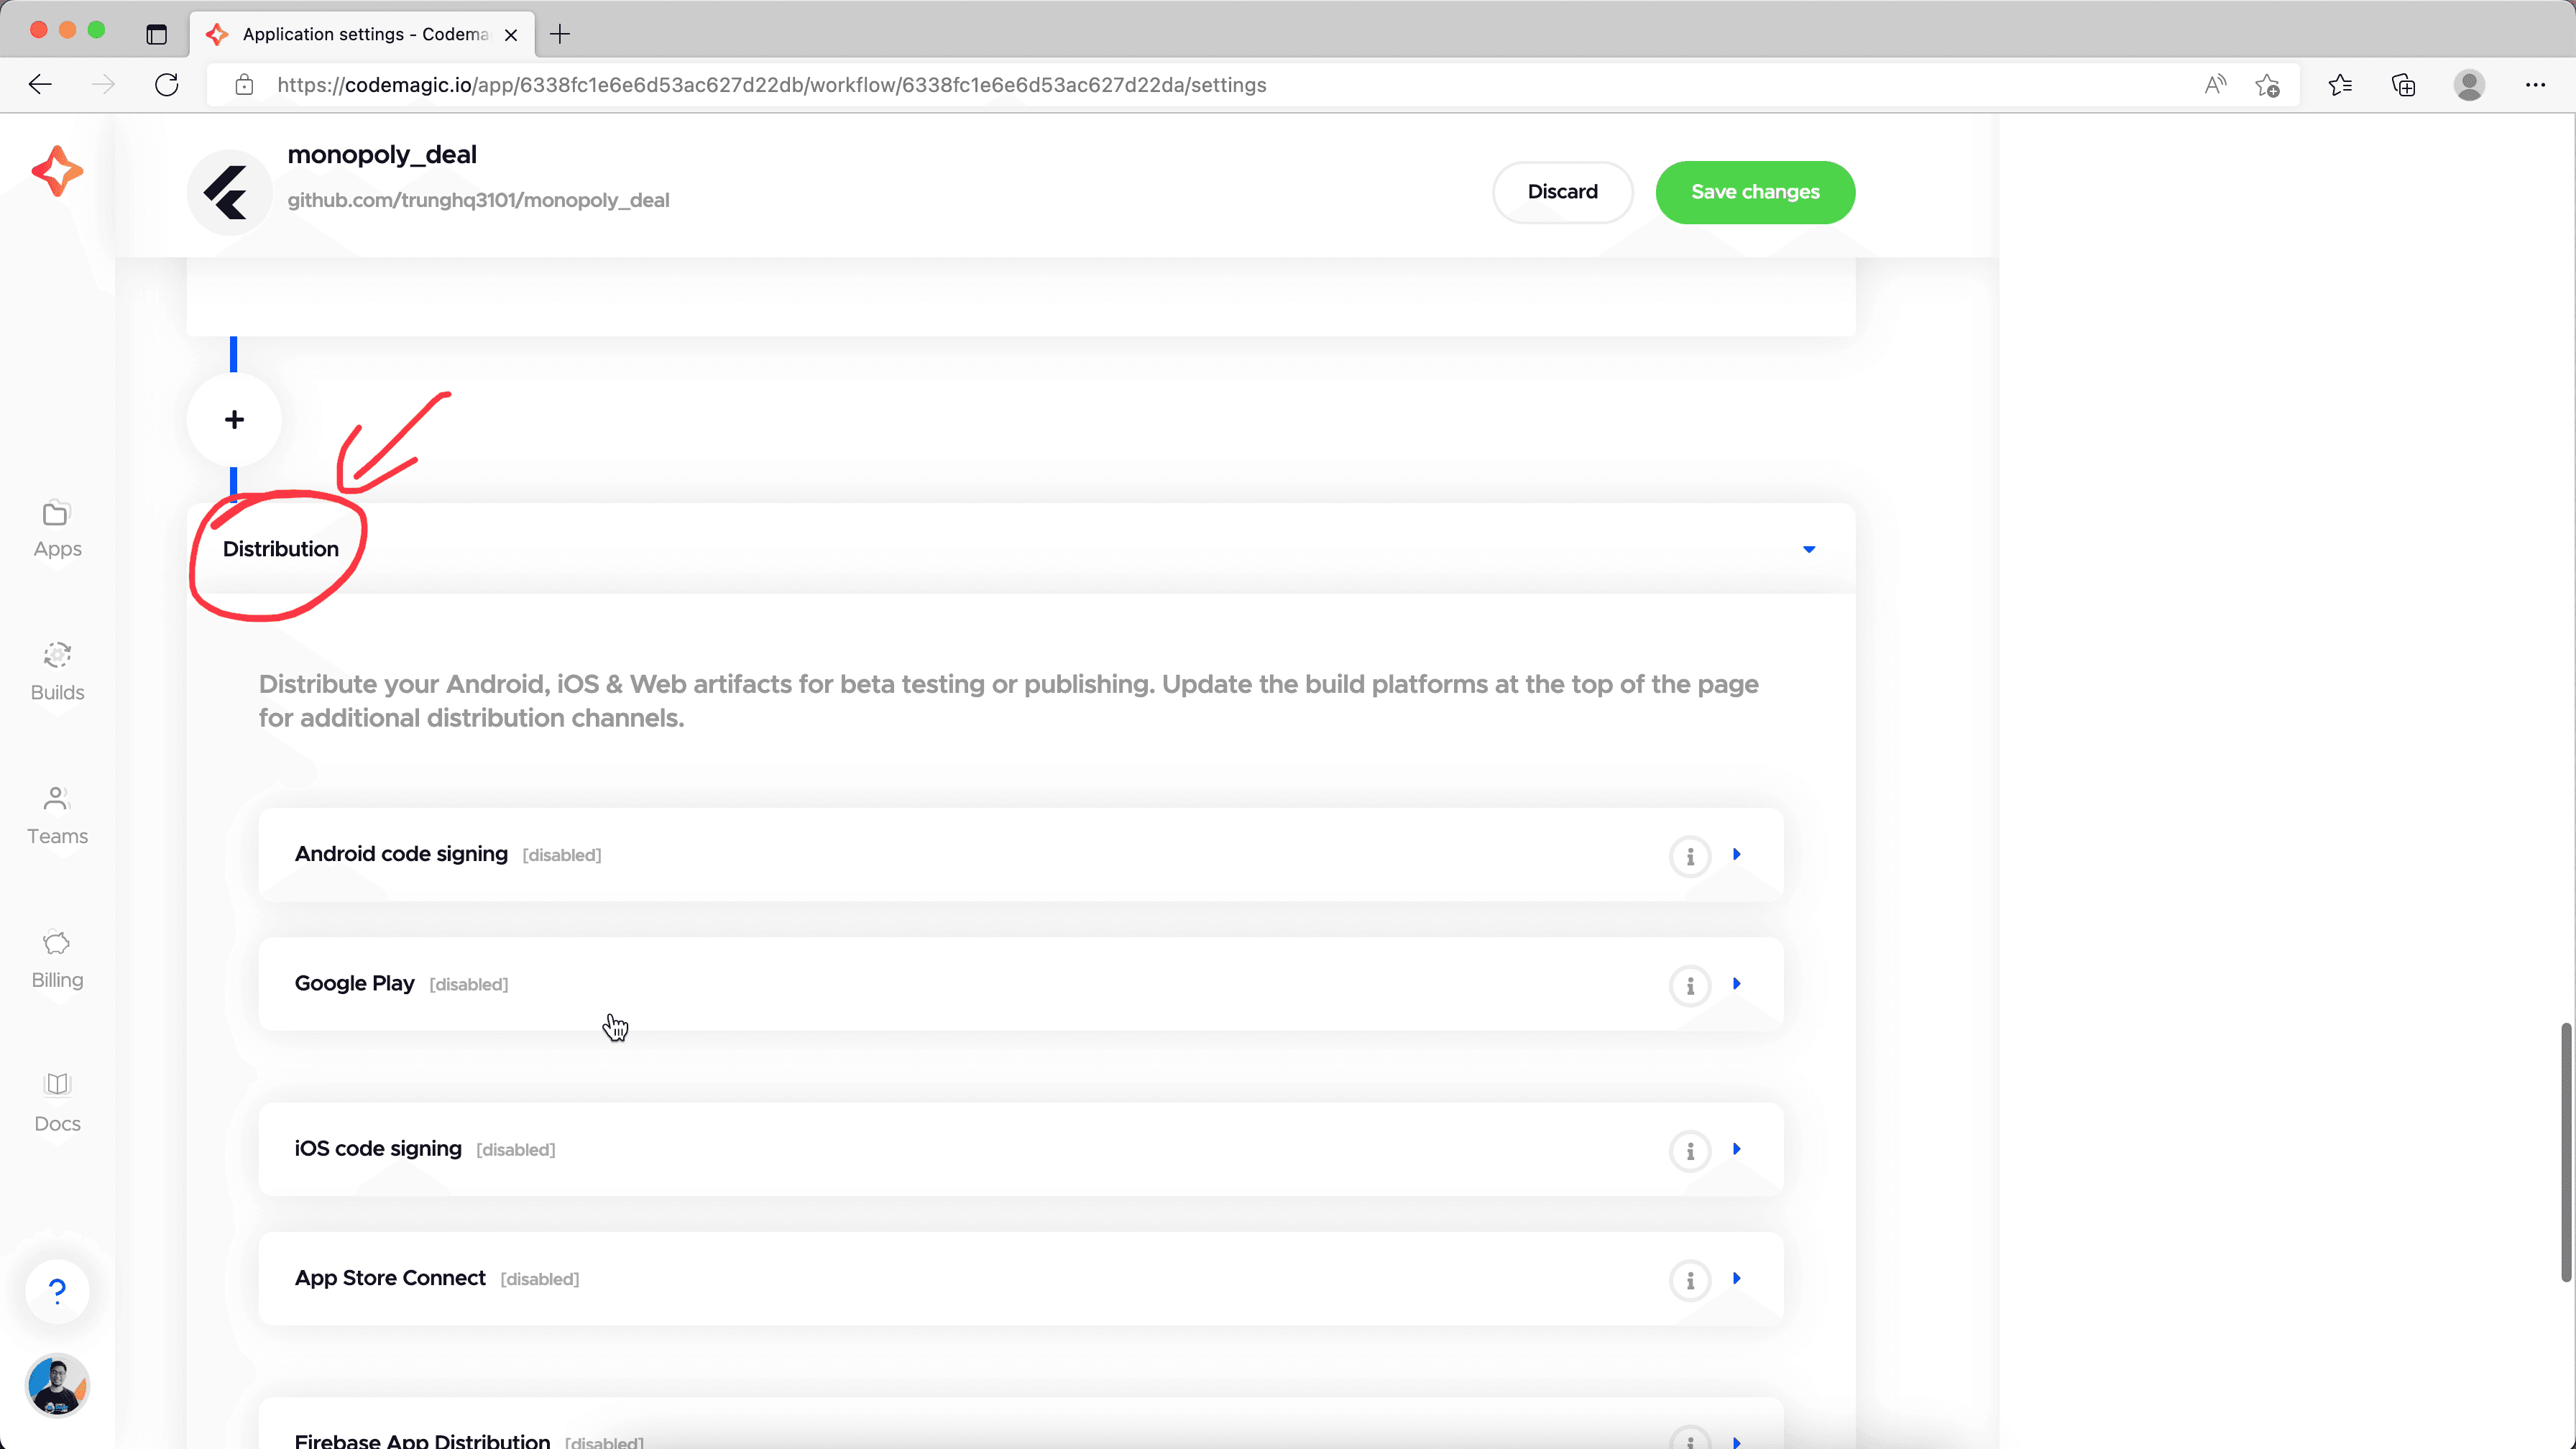
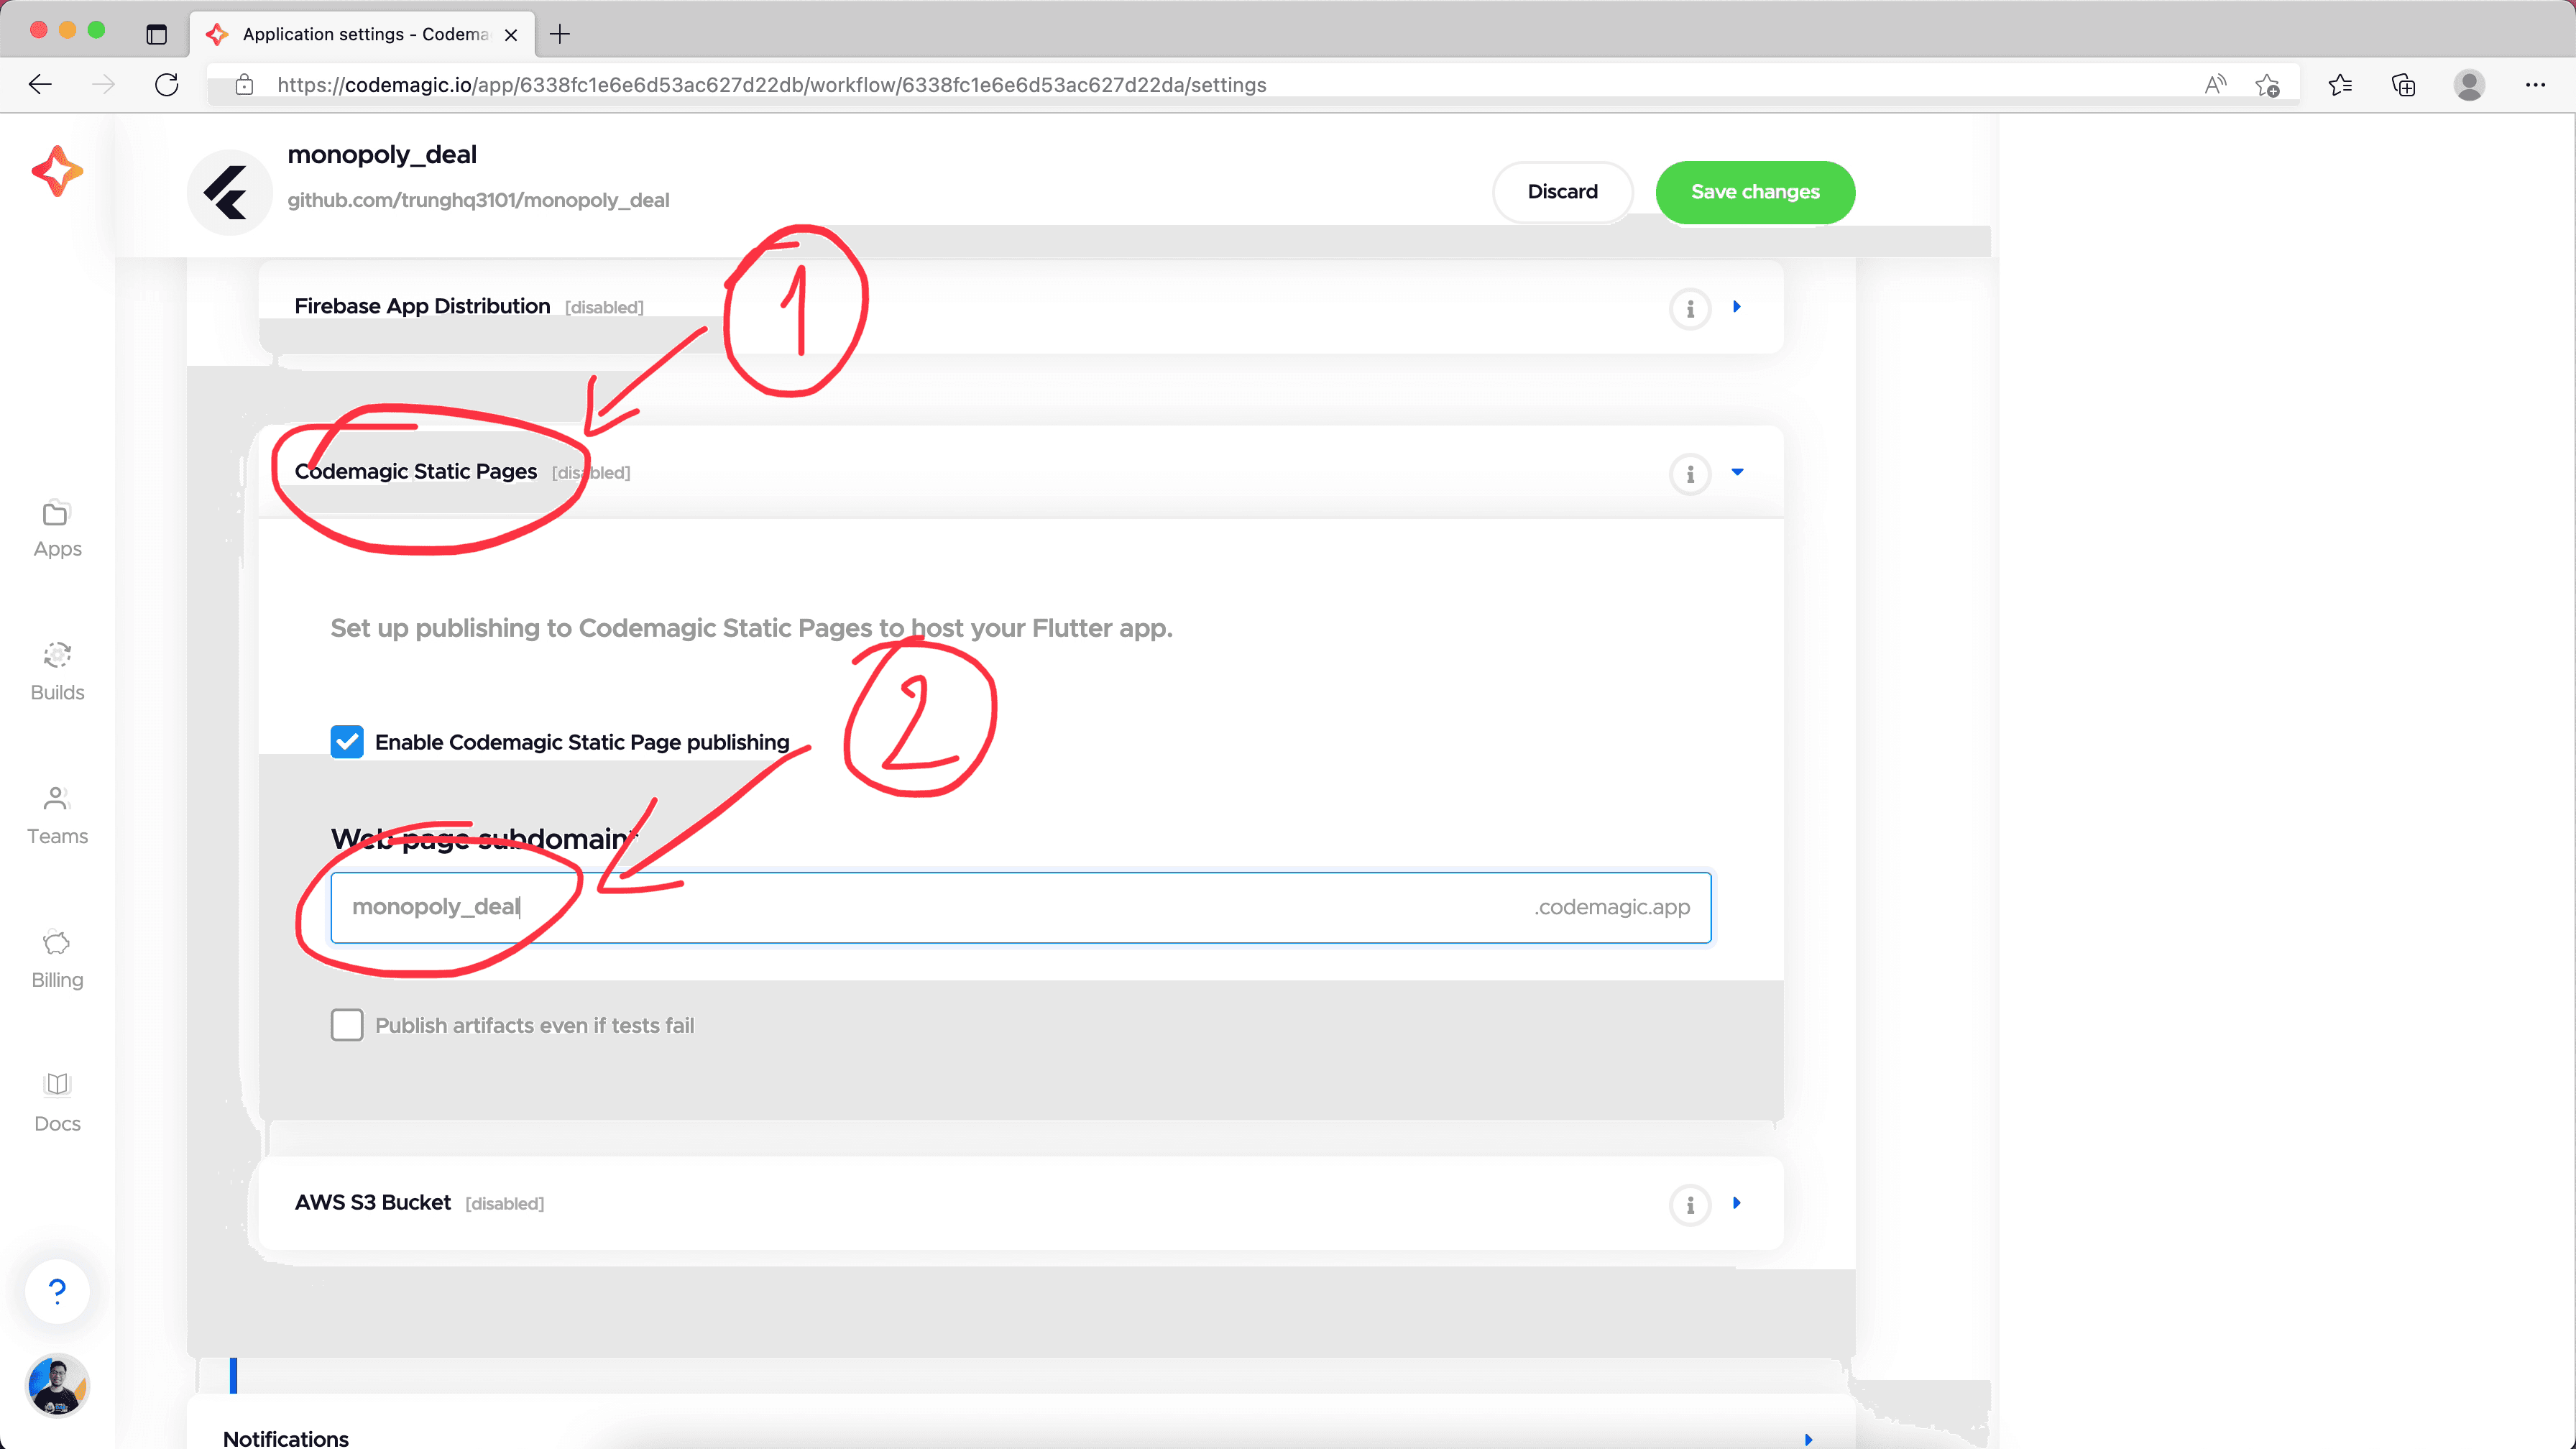
Now, we continue by expanding the Distribution box and scroll a little bit to find the Codemagic Static Pages box. Here, we can configure the web page subdomain to publish our game web app. Codemagic offers us a free subdomain and they will also host our game on their service, so we don't have to care about hosting and other stuffs.
We only need to specify the name we want here. In this case, we want it to be monopoly_deal.
Nothing left here. We scroll up to the top to deselect the Android and iOS option because we agreed to skip it at the beginning of this article. Then, we click on Save changes button.
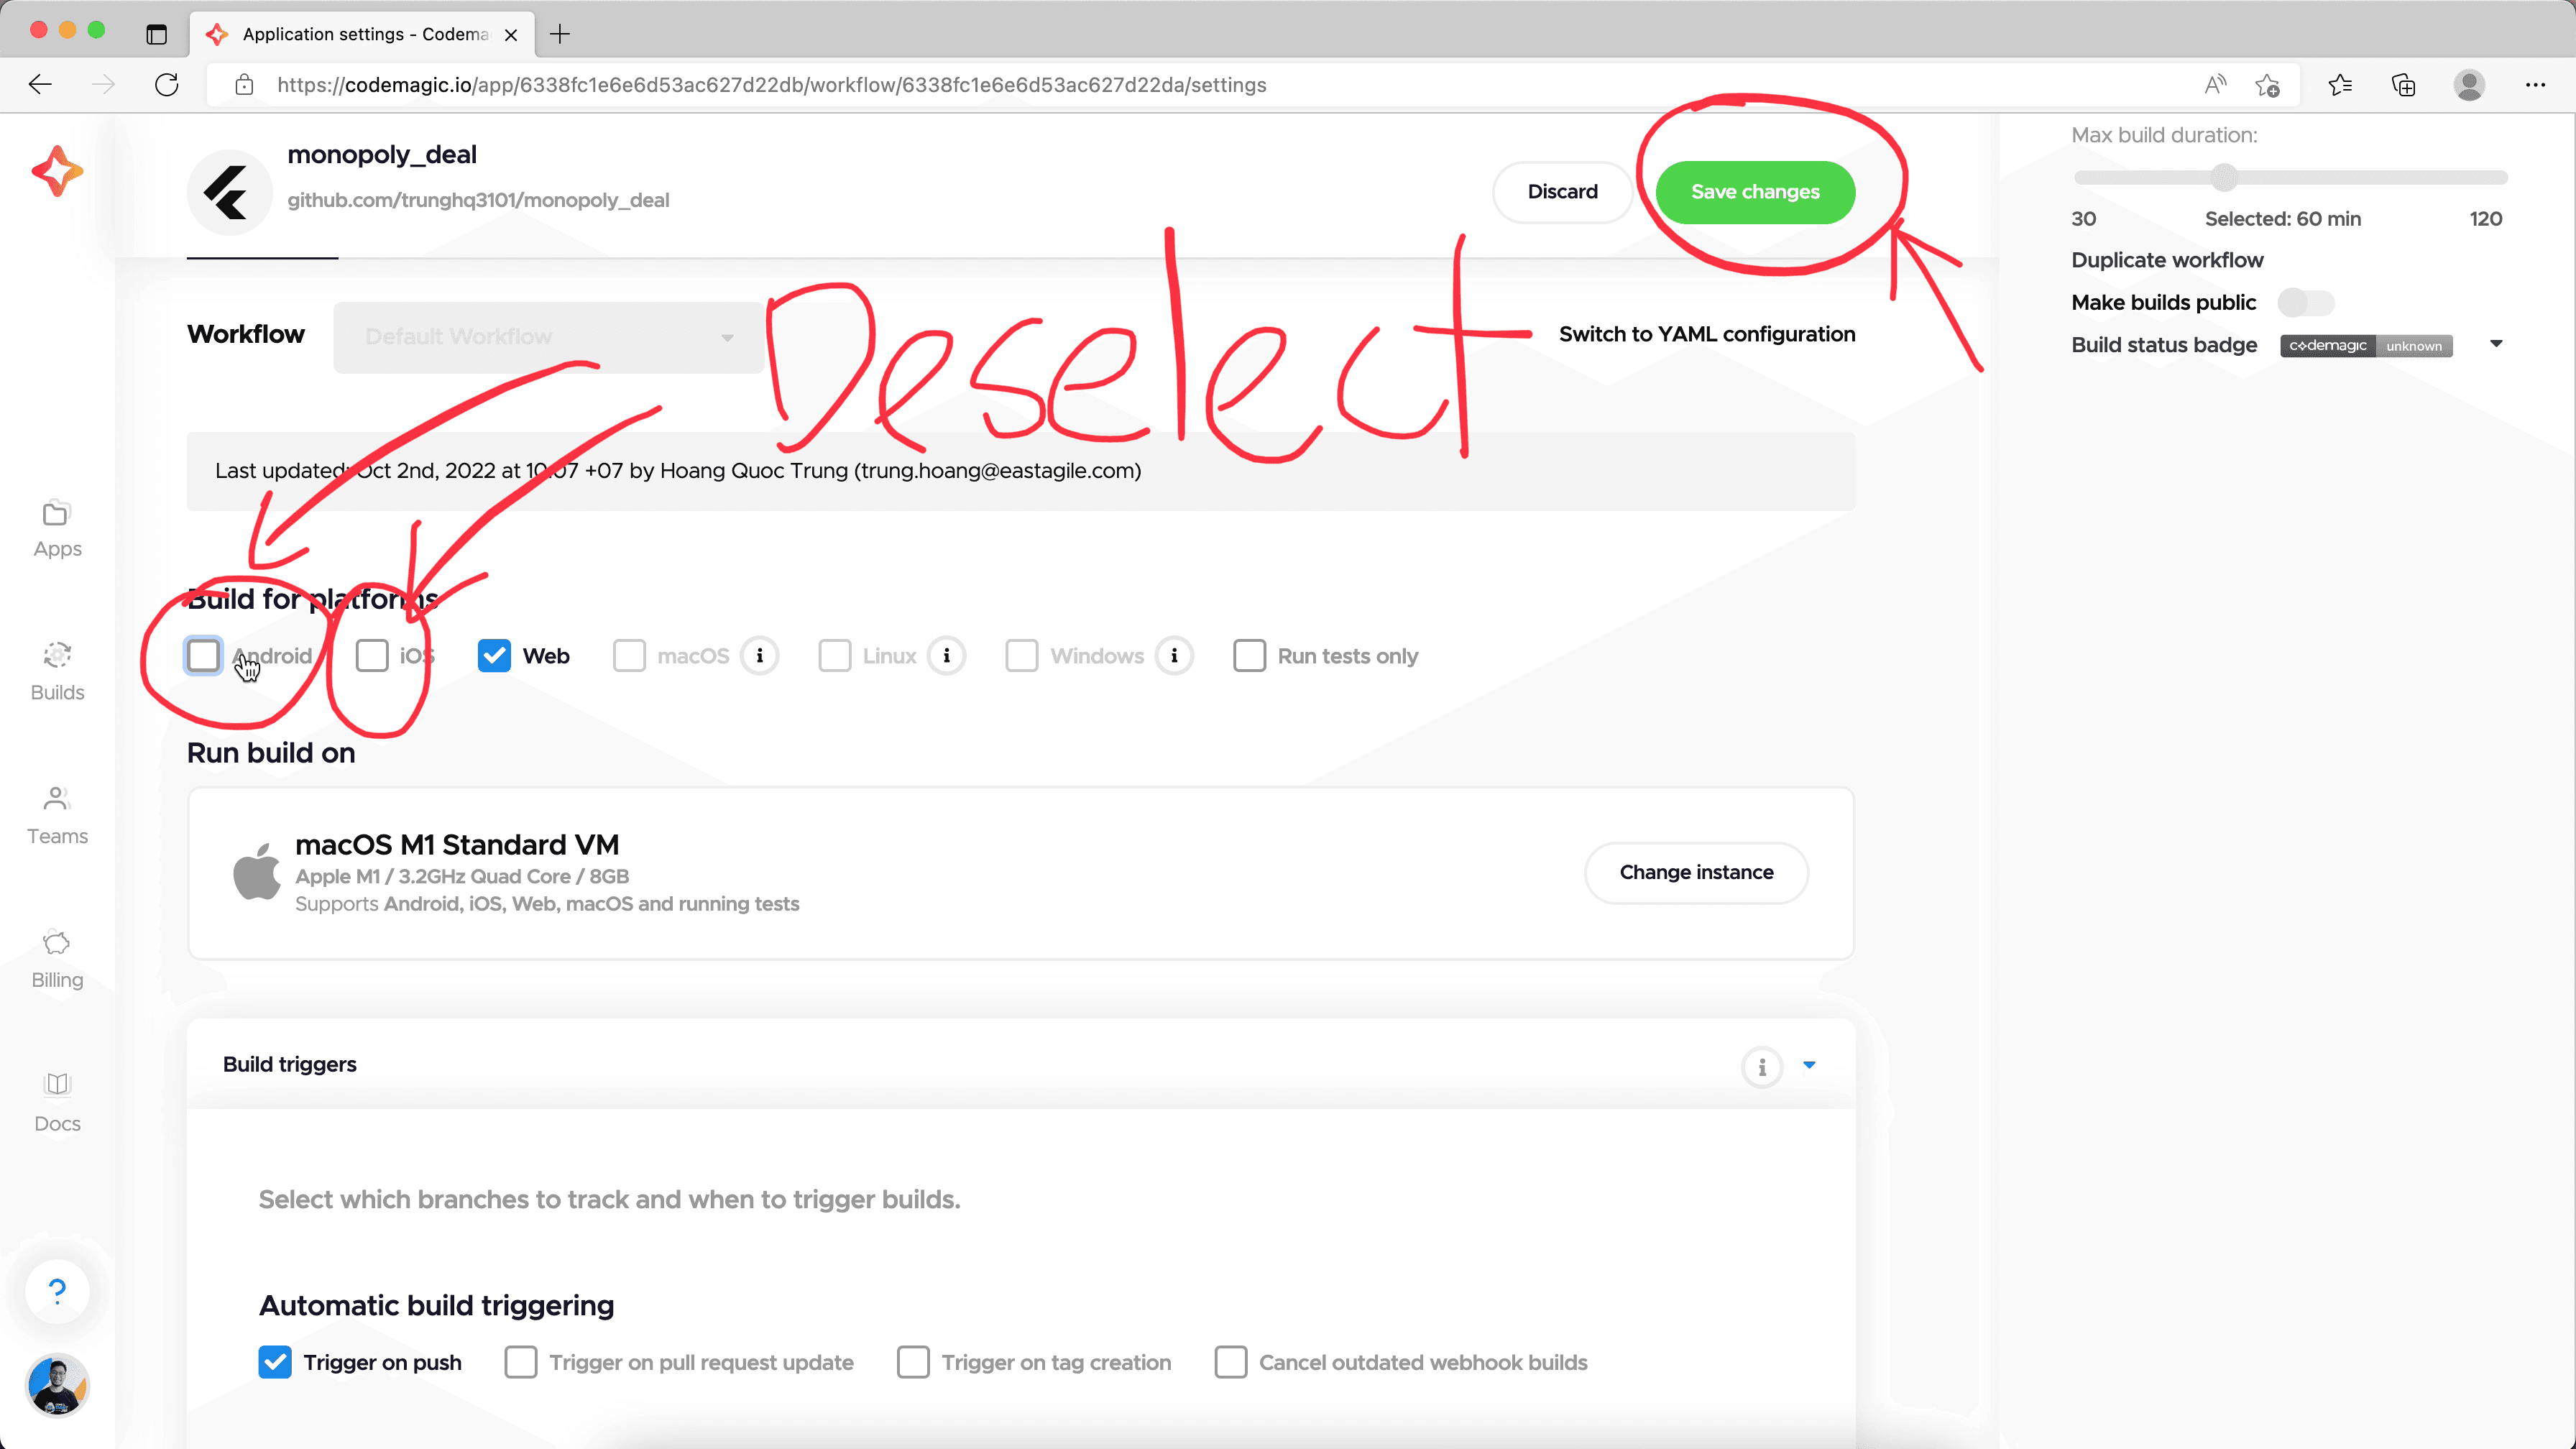
All our configurations are saved. We're basically done.
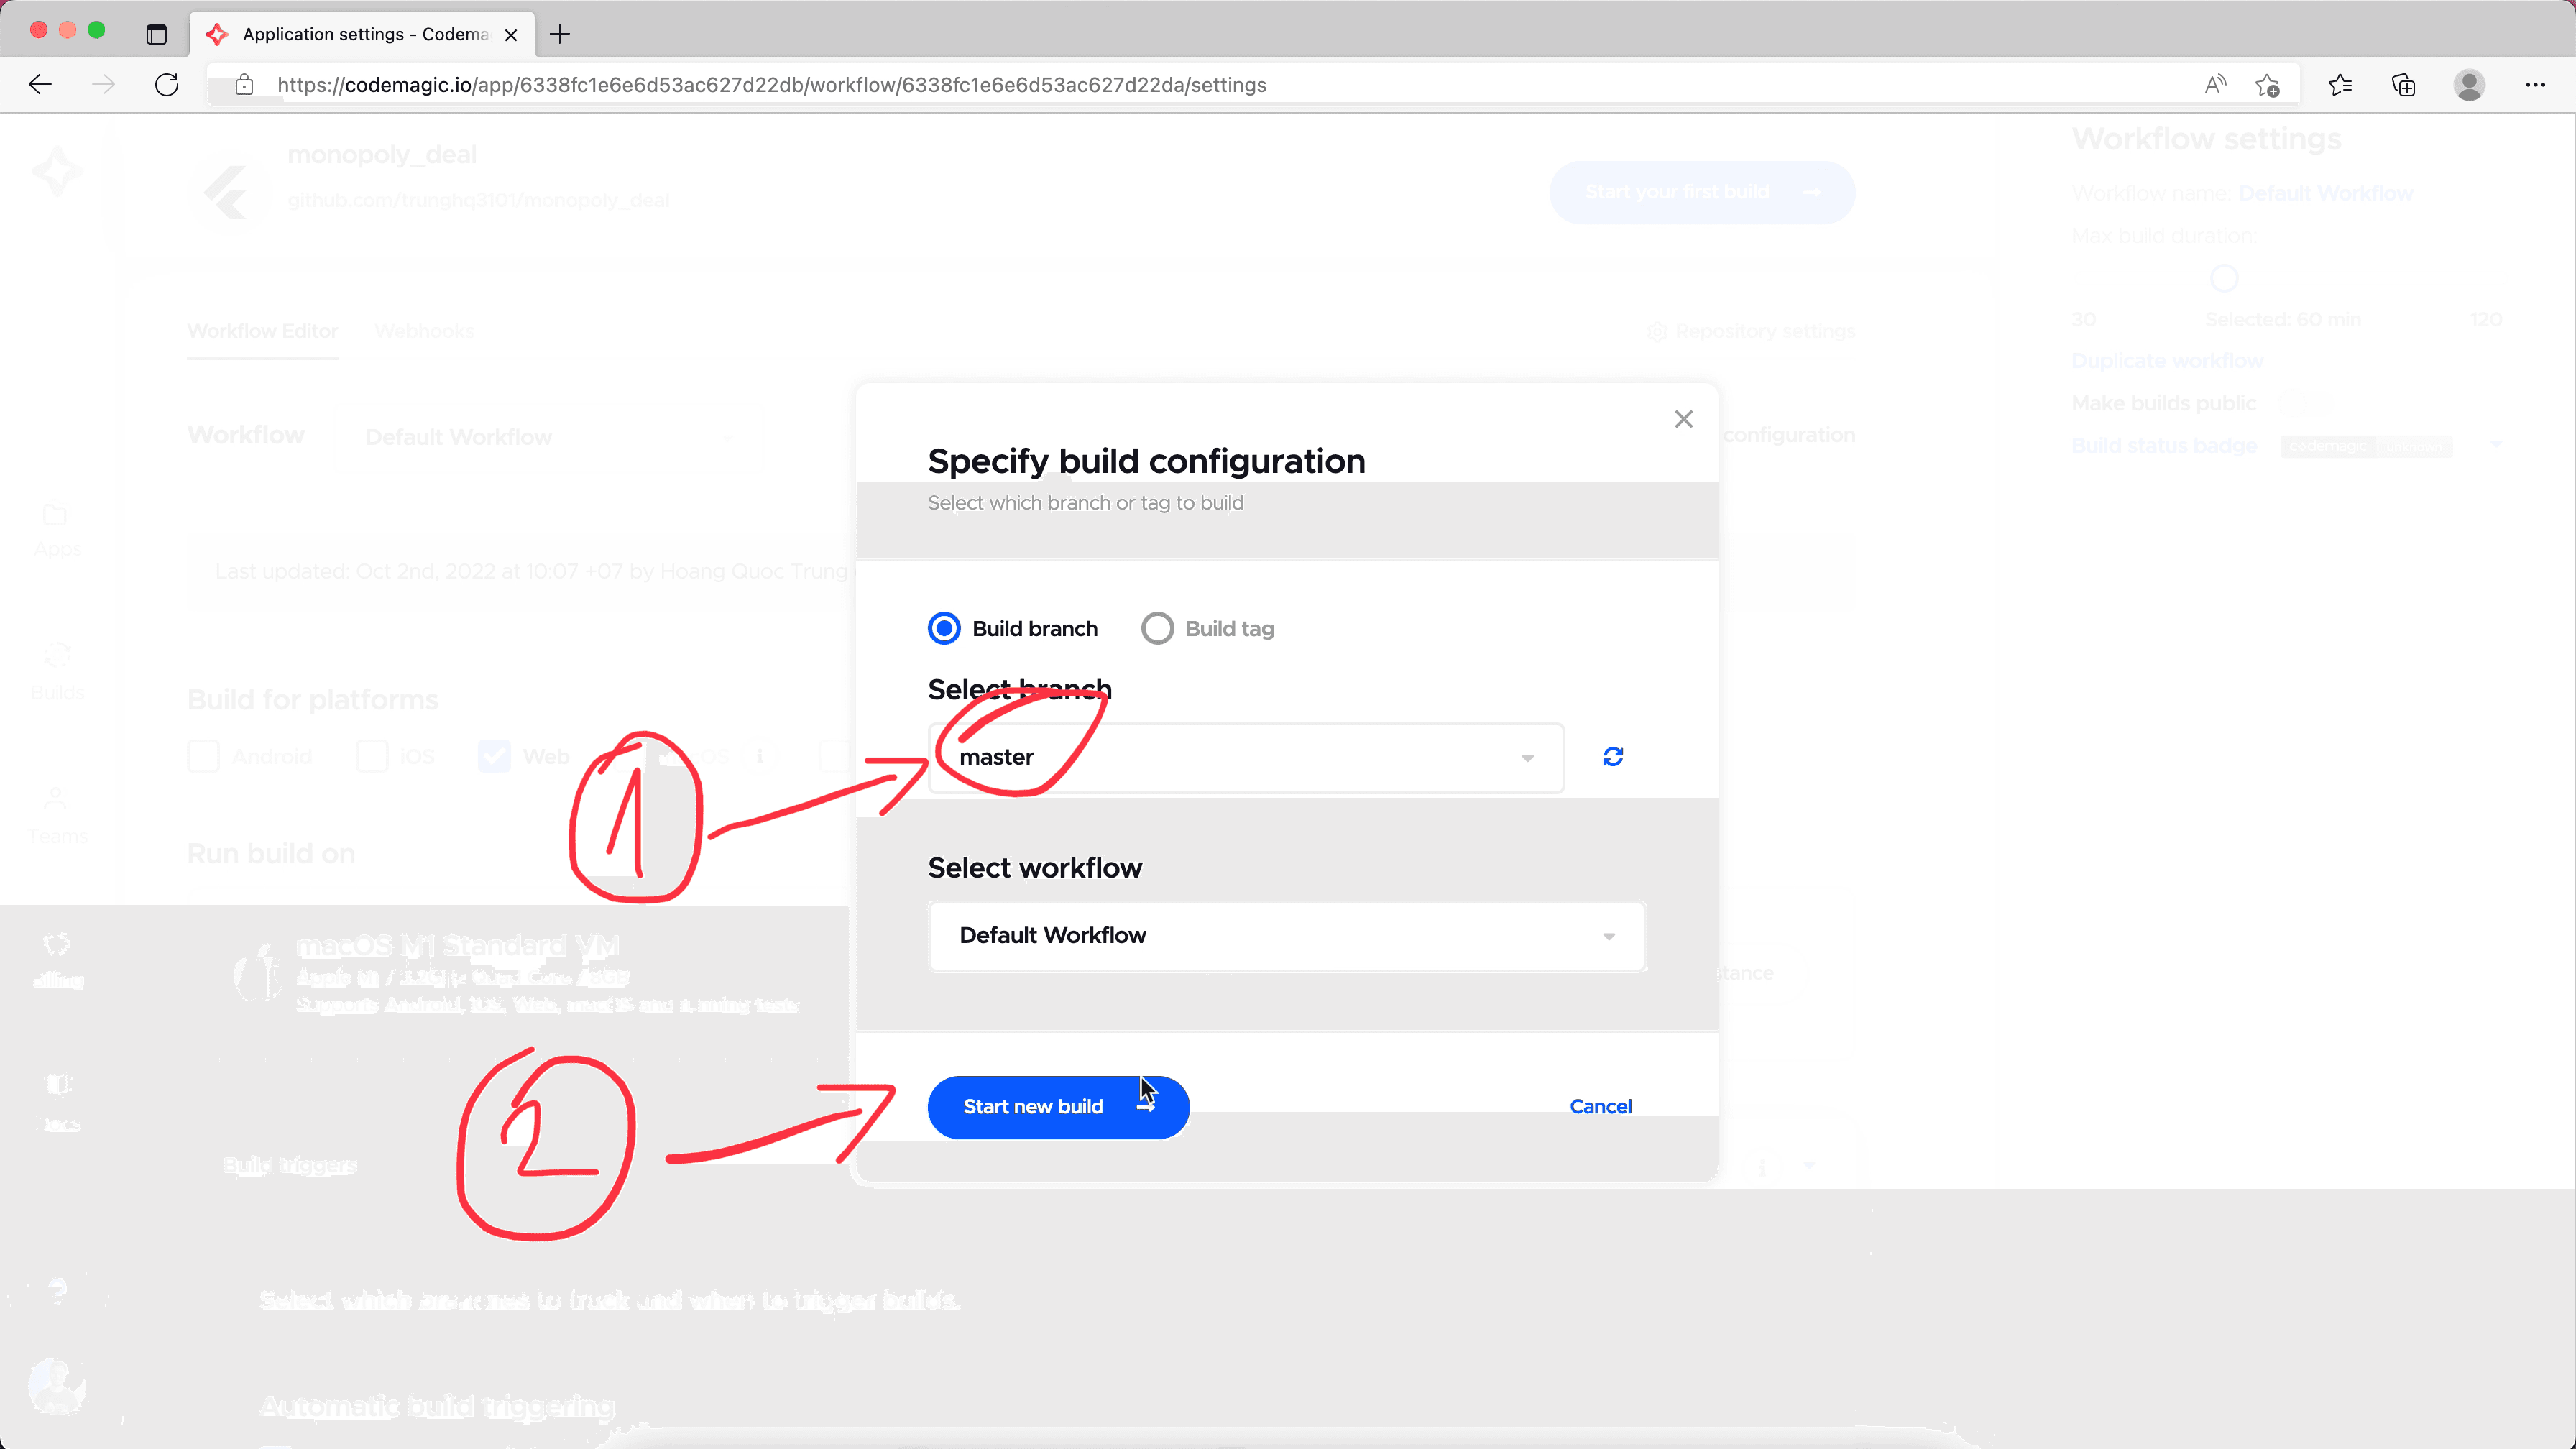
After that, we can start the first build to verify the configurations. We can push a new commit to the master branch to trigger the build, or we can trigger it manually here by select the master branch and click on the Start new build button.
If you are following this series, you should be staying at this chap_3 branch. If it's the case, you will fail this build because of erros while running flutter analyze:
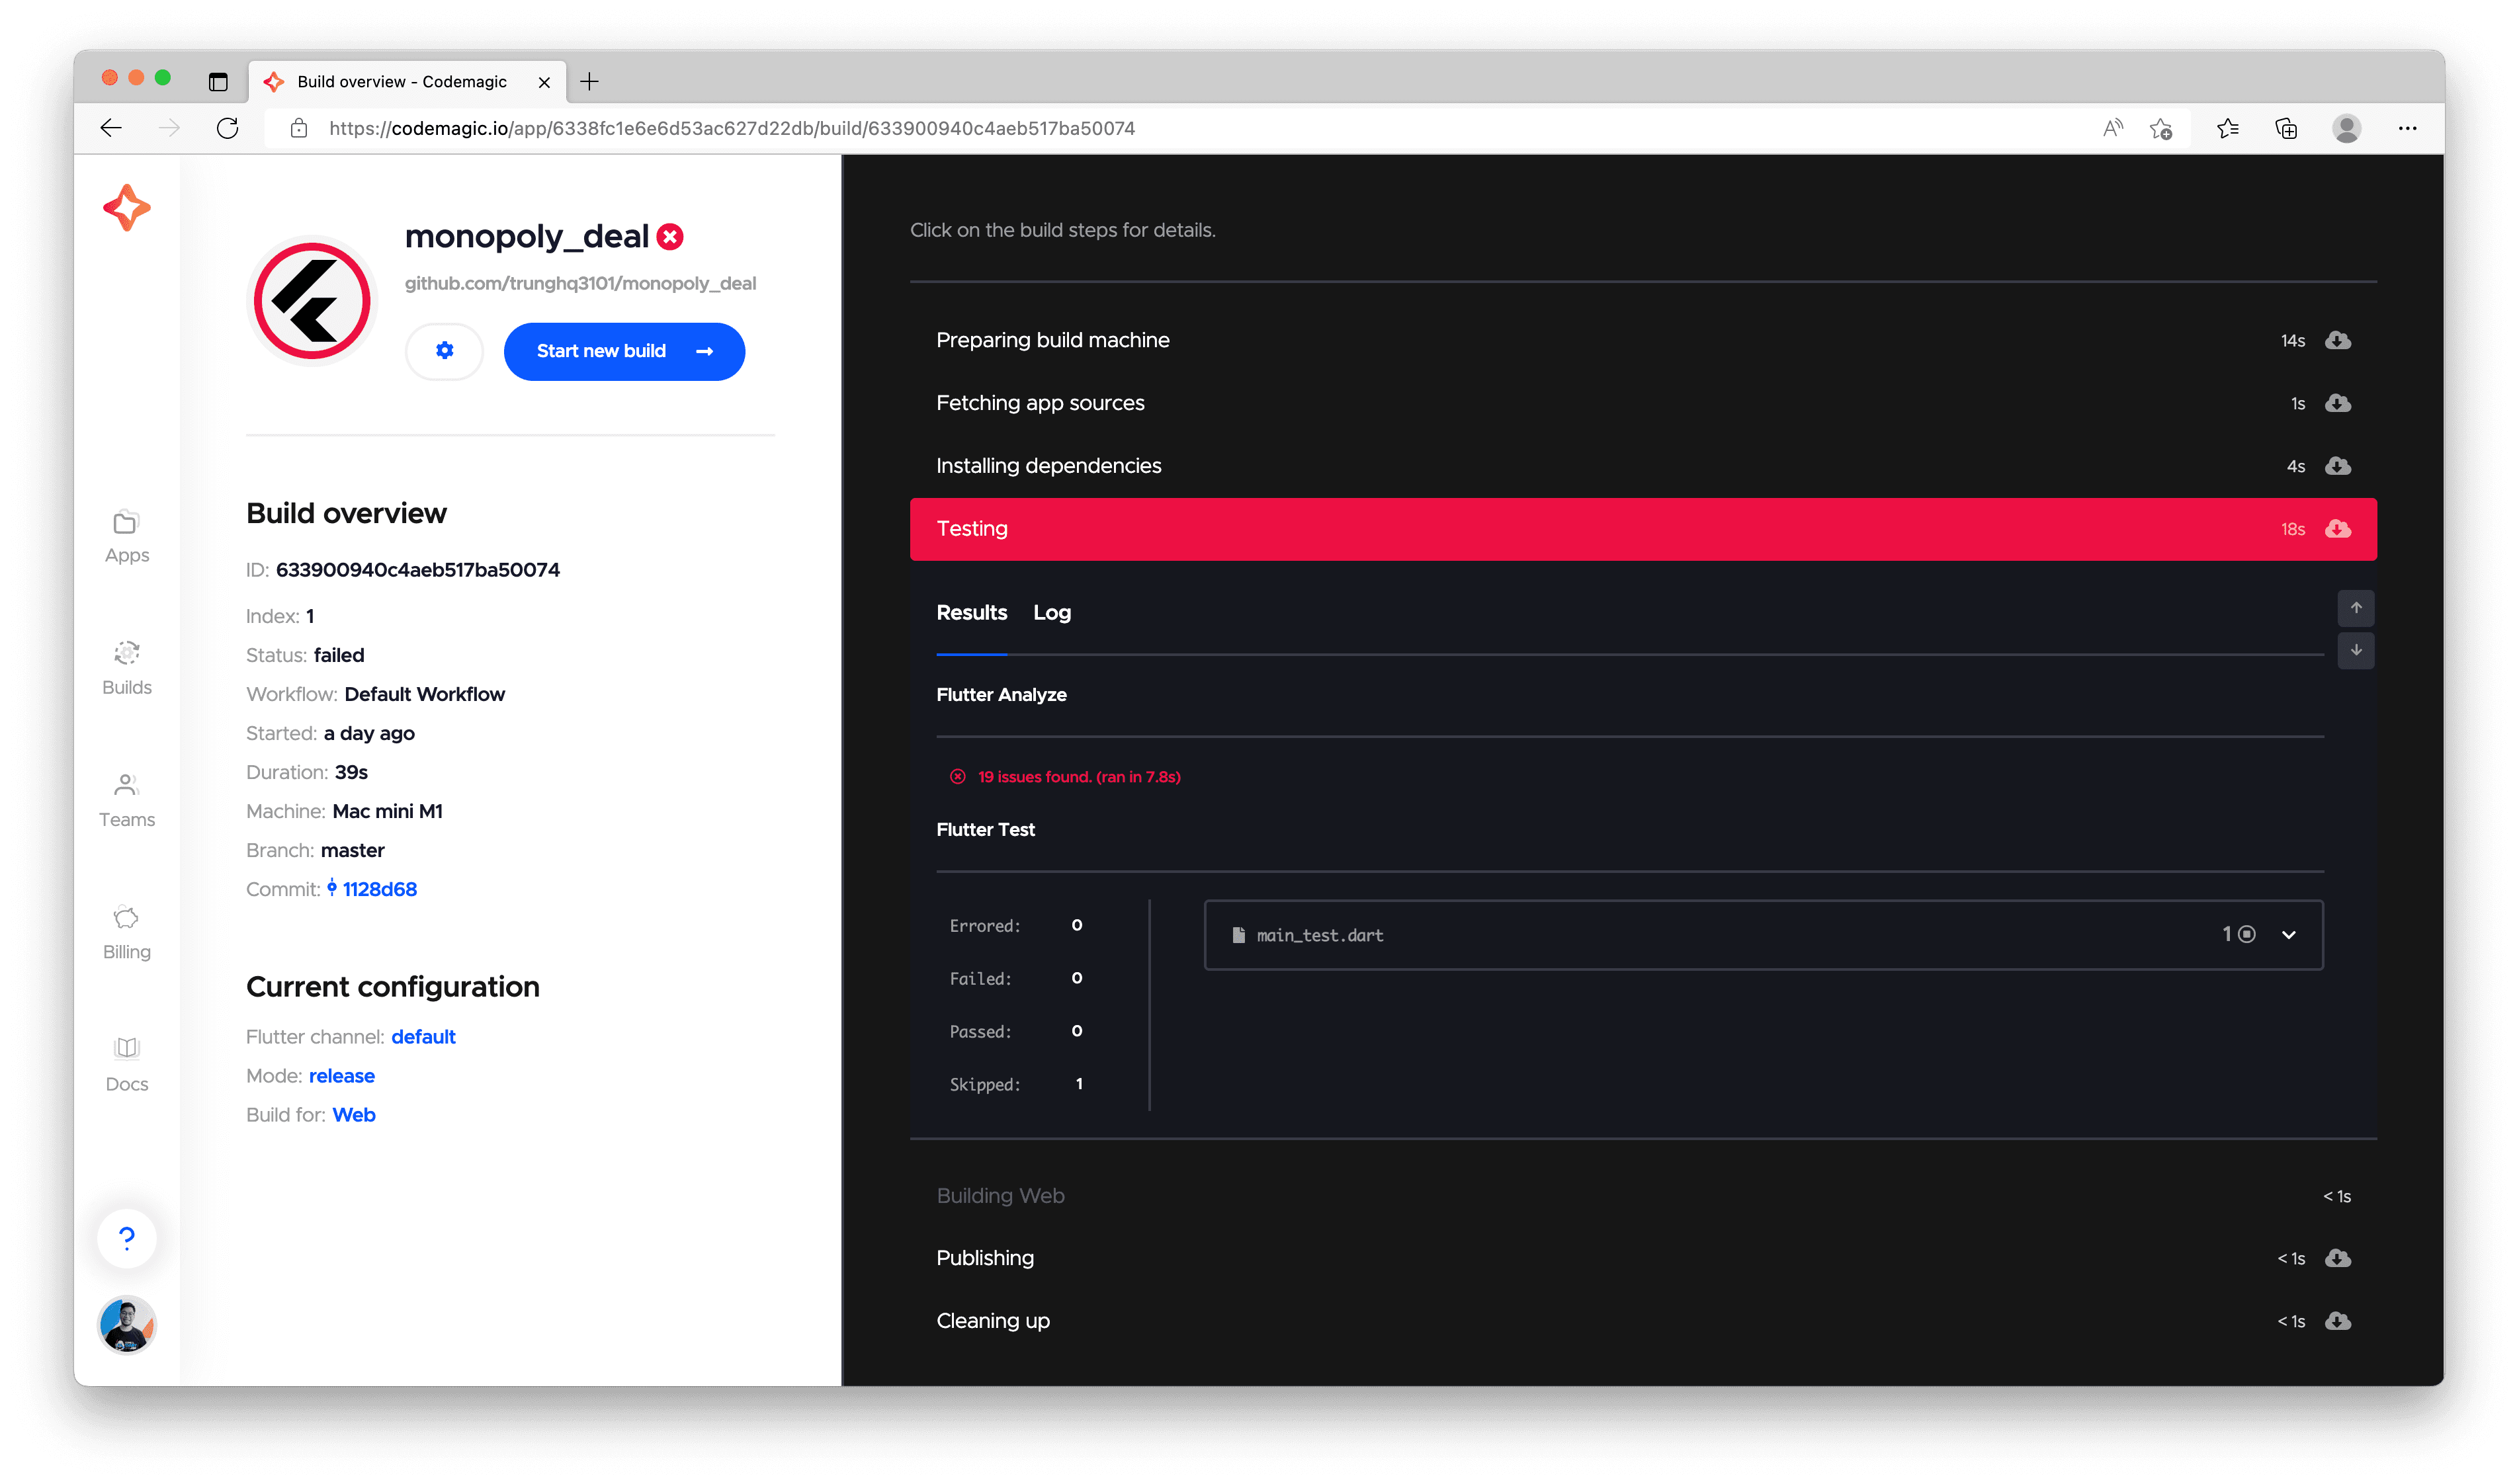
That's because we haven't fixed warnings about the code format in that branch. The warnings come from the Flutter linter, a tool of checking code for potential formatting issues. It ensures consistent code format quality during a lifetime of a Flutter project. The flutter analyze command just run the Flutter linter check under the hood.
Fix linting errors
Now, we will fix this build. Let's open the project in our local machine, checkout chap_3 branch and run this command:
flutter analyze
It would show 19 issues found like below:
Analyzing monopoly_deal...

   info • Prefer const with constant constructors • integration_test/pause_game_test.dart:13:24 • prefer_const_constructors
   info • Name non-constant identifiers using lowerCamelCase • lib/models/card_model.g.dart:9:14 • non_constant_identifier_names
   info • Name non-constant identifiers using lowerCamelCase • lib/models/card_model.g.dart:13:22 • non_constant_identifier_names
   info • Name non-constant identifiers using lowerCamelCase • lib/models/game_model.g.dart:9:14 • non_constant_identifier_names
   info • Name non-constant identifiers using lowerCamelCase • lib/models/game_model.g.dart:22:22 • non_constant_identifier_names
   info • Name non-constant identifiers using lowerCamelCase • lib/models/player_model.g.dart:9:16 • non_constant_identifier_names
   info • Name non-constant identifiers using lowerCamelCase • lib/models/player_model.g.dart:16:22 • non_constant_identifier_names
   info • Prefer const with constant constructors • widgetbook/main.dart:19:11 • prefer_const_constructors
   info • Prefer const with constant constructors • widgetbook/main.dart:20:11 • prefer_const_constructors
   info • Prefer const with constant constructors • widgetbook/main.dart:21:11 • prefer_const_constructors
   info • Prefer const with constant constructors • widgetbook/main.dart:22:11 • prefer_const_constructors
   info • Prefer const with constant constructors • widgetbook/main.dart:23:11 • prefer_const_constructors
   info • Prefer const with constant constructors • widgetbook/main.dart:24:11 • prefer_const_constructors
   info • Prefer const with constant constructors • widgetbook/main.dart:25:11 • prefer_const_constructors
   info • Prefer const with constant constructors • widgetbook/main.dart:26:11 • prefer_const_constructors
   info • Prefer const with constant constructors • widgetbook/main.dart:27:11 • prefer_const_constructors
   info • Prefer const with constant constructors • widgetbook/main.dart:28:11 • prefer_const_constructors
   info • Prefer const with constant constructors • widgetbook/main.dart:50:27 • prefer_const_constructors
   info • Prefer const with constant constructors • widgetbook/main.dart:53:27 • prefer_const_constructors

19 issues found. (ran in 3.4s)
Actually, there are only 2 issue types here: prefer_const_constructors and non_constant_identifier_names. However, the non_constant_identifier_names issue happens in the *.g.dart files, which are generated by the freezed package. If we fix issues in those files this time, those issues will still come back the next time we re-generate them. One possible solution is to ignore this issue type while running flutter analyze. We can do it by adding this line to the analysis_options.yaml file.
analyzer:
  errors:
    invalid_annotation_target: ignore
+   non_constant_identifier_names: ignore
For the other issue type, the prefer_const_constructors, it's a reasonable issue, so we will fix it in all places in our code by running this command at the root directory of the project:
dart fix --apply
We will see a lot of code changes applied to fix those prefer_const_constructors issues. Now, we can run the flutter analyze command again and notice that there is no issue found at all. All issues have been fixed (and ignored).
Now, commit the code and push it to the master branch. We will see the build pipeline is automatically triggered because the condition we set up was met.
This time, the build will succeed.
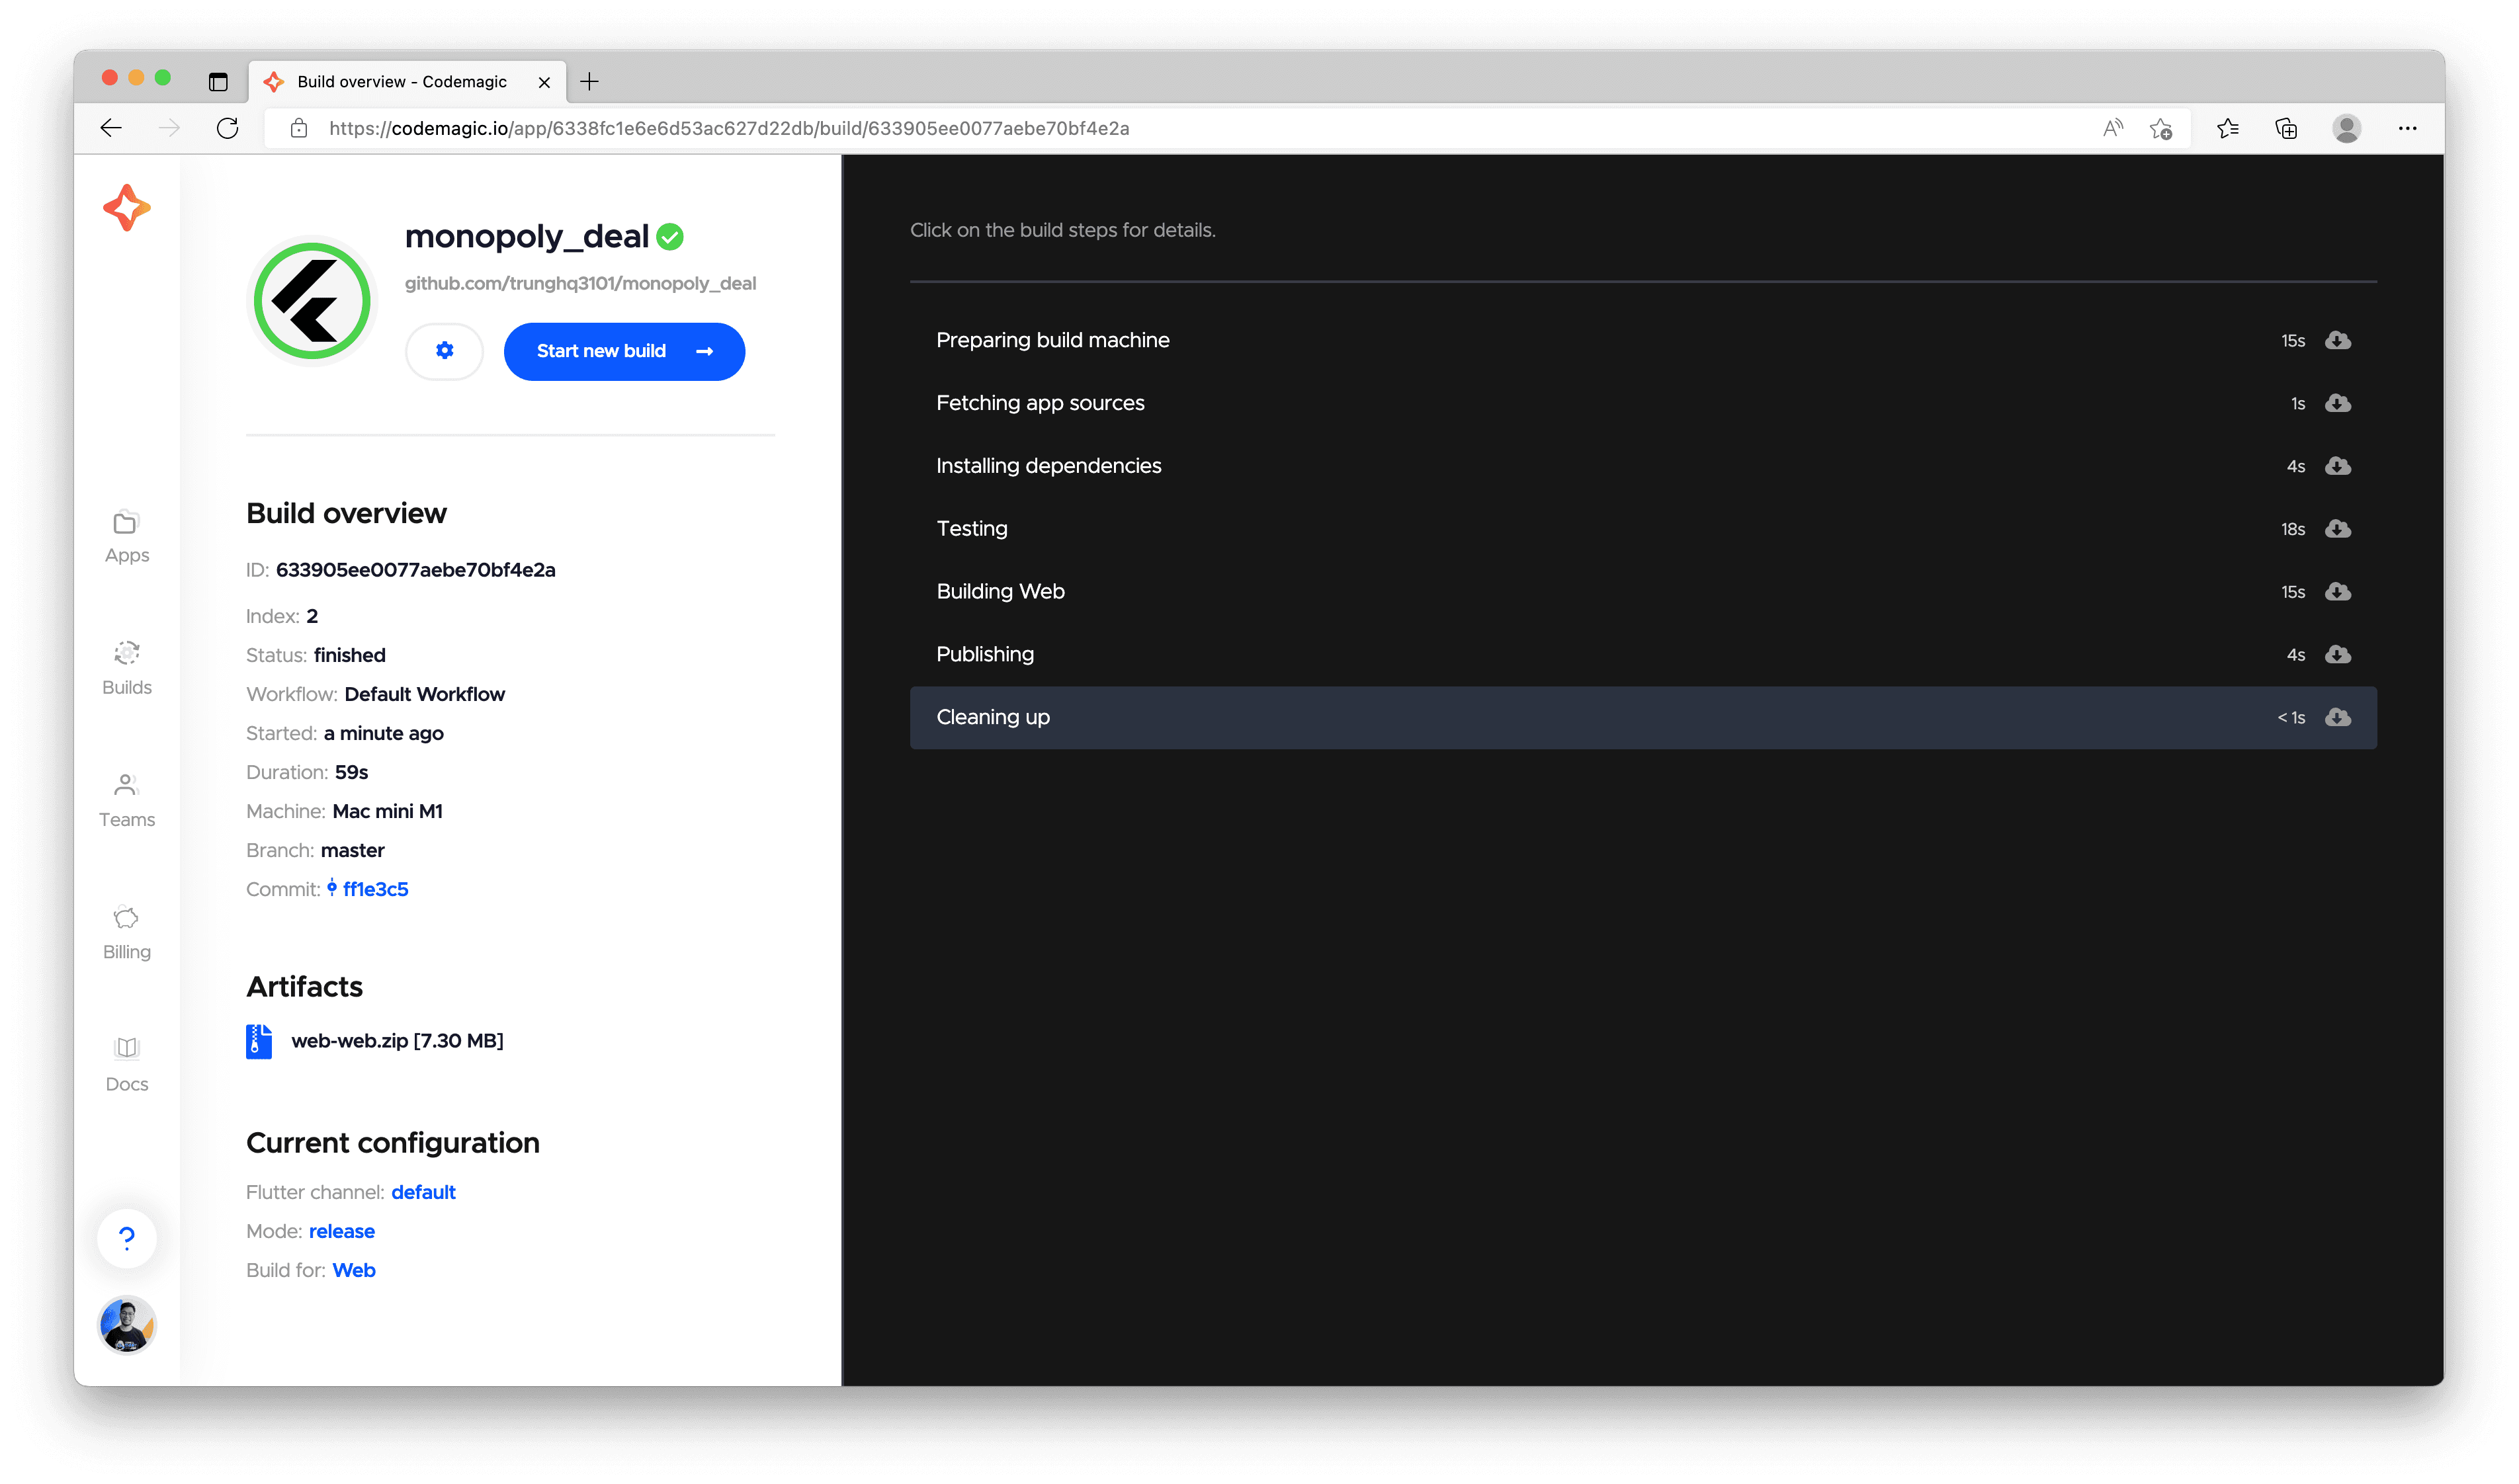
We can see our game in action at this sub-domain: https://monopoly_deal.codemagic.app
(Bonus) Setup to automatically fix linting errors in VSCode
We can make this process automatical. Instead of running flutter analyze and dart fix --apply manually each time, we can set up the VSCode editor to do it everytime we save the code.
In VSCode window, press this shortcut: command + , (for Mac) or ctrl + , (for Windows/Linux). It will open the Settings page of VSCode. Type codeaction in the search bar and click on Edit in settings.json link inside the Code Actions On Save section.
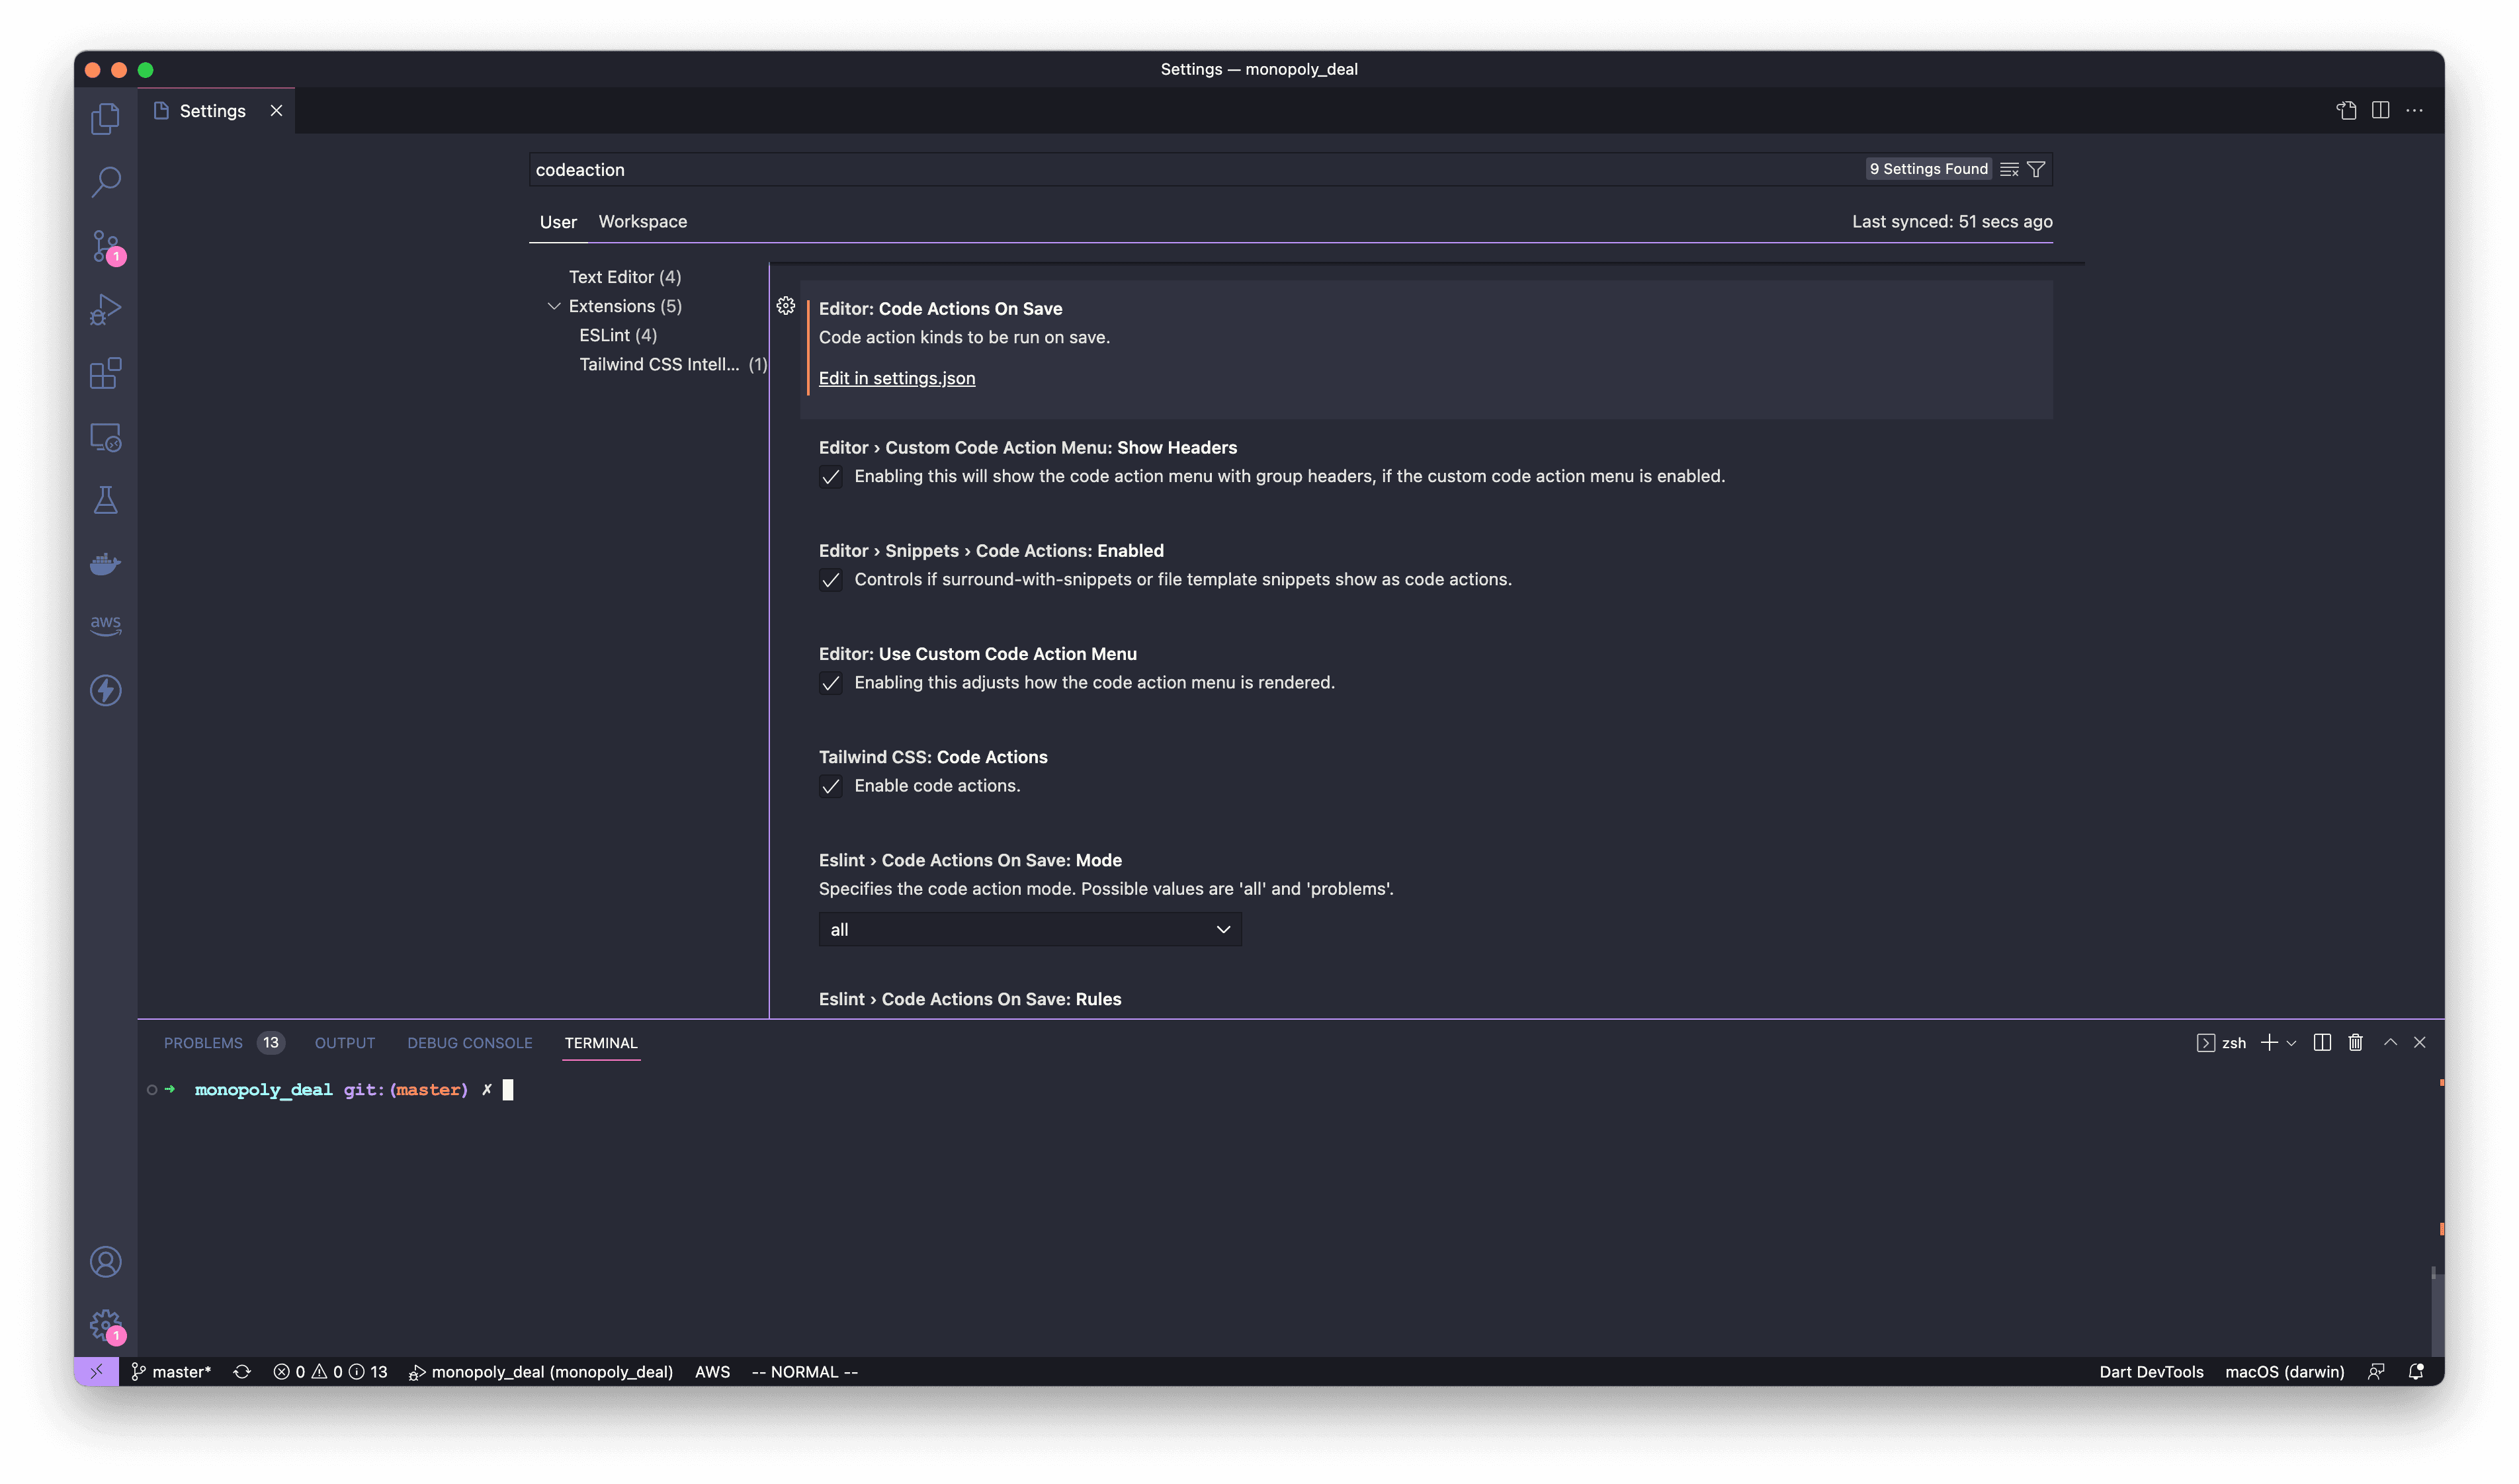
It will open the settings.json file. Add this JSON object to that file and save it.
  "editor.codeActionsOnSave": {
    "source.fixAll": true,
  }
Now, whenever we save a file, it will automatically apply fixes to all the formatting issues in that file. Pretty cool!